
DBABR stands for DBA followed by my initials. DBABR bears little resemblance to DBA 3.0 as my version evolved from a solo version of DBA 1.0 authored by my friend Jim. I simply added a few things like double sized elements for the purposes of looks and some morale rules to avoid endless recoils. If you are interested in the changes you can find them at this link-An Explanation of DBABR
I prefer doing historical battles when possible and generally use the excellent maps found at Command and Colors Ancients map scenarios.
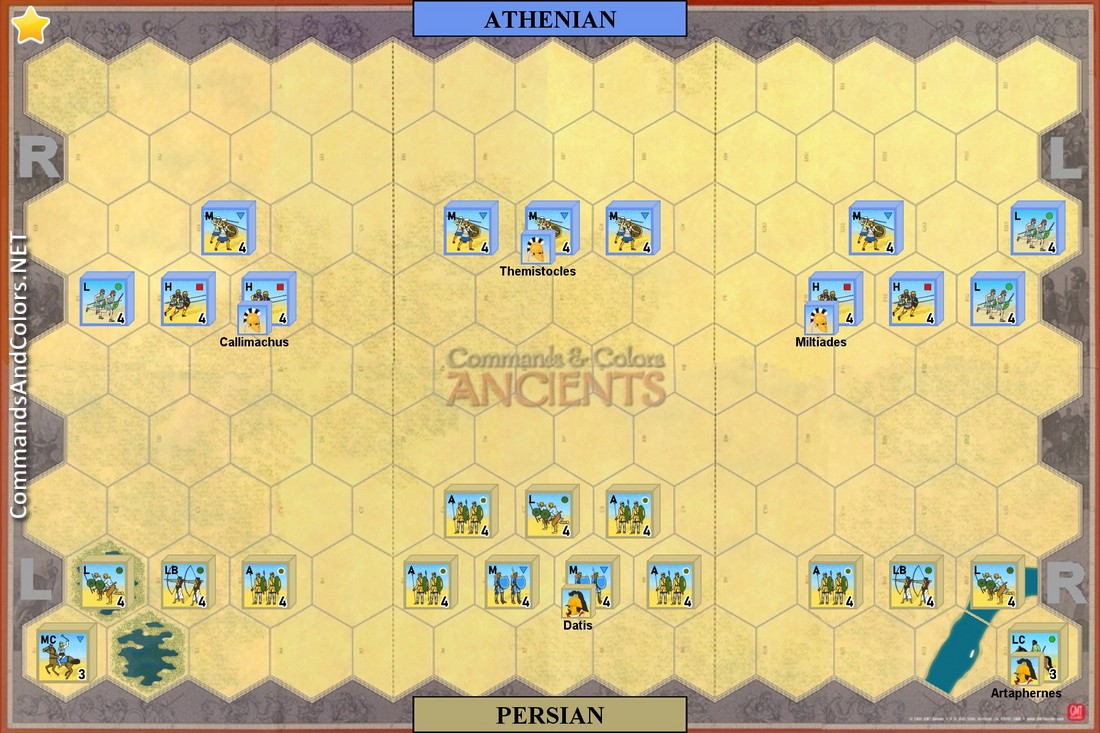
In the case of this game I used the Don Clarke's Marathon variant found at the site. I convert the CCA counters to corresponding DBA elements. My friend Mike who supplied all the figures for the game set up his table and we played the game.
The letters in the OB refer to morale. L is for levy, O is for ordinary and V is for veteran. Morale is tied to the number of recoils a unit can endure before destruction. The other standard rules for destroying elements still apply.
The Order of Battle looked like this:
Greeks
Callimachus Greek Right full die roll pips to move)
3-Sp, V
1-Ps, O
Themistocles Greek center, full die roll pips to move
3-Sp, V
Note:We decided prior to the game to play the center Greek in single rank since historically that's what they did. In the game this closed the gaps on the map. Although we use the maps we do adjust somewhat for the game board and\or historical reasons. Nevertheless, the maps are excellent templates for a historical battle.
Miltiades Greek left, full die roll pips to move
3-Sp, V
2-Ps, O
The distance between the two armies was reduced from our usual 18" to 12" to facilitate the surprise charge by the Athenians. The full die rolls for movement pips also helped the Greeks to close in a more coordinated fashion.
Persians
Unkown Commander Persian left, 1\2 die roll pips to move
1-LtSp\BW, O
1-Bw, L
1-Ps, O
1-Cv, V
Datis Persian Center, full die roll pips to move
4-Lt\Sp, O
2-LtSp, O
1-Ps
Ataphernes Persian right, 1\2 die roll pips to move
1-LtSp\BW, O
1-Bw, L
1-Ps, O
1-Lh, V
Note: The CCA categories do not translate perfectly to DBA elements, so educated, subjective guesses had to be made.This was a difficult game to have play balance. When I set up a historical scenario I want to use what history I can but at the same time give the side with less advantage at least a 33% of achieving victory. In this case that was very difficult to do given there was no room for the Persians to maneuver, the distance between the battle lines was only 12" and the Greek morale was vastly superior to the Persian. All these modifiers were in my opinion accurate but probably reduced the Persian side's ability to win to 16% rather than my rule of thumb 33%.
Nevertheless, the game was a lot of fun and the result very historical and the beer tasty!
I will use the pictures below to explain some the action.


 |
| The initial set up. The Persian left borders the sea, the right borders hills and the terrain to the rear is swampy. Clearly, the Persians had no idea the Greeks would attack. |
 |
| Another view of the initial set up. The single stands of the Greek center are clearly visible. The Persian center would have one shot to break through the Greek center before the stronger Greek flanks would make short work of the weak Persian flanks. |
 |
| Neat shot of the Greek center who would have to hold the Persian center. |
 |
| The Persians recognize the danger and prepare to advance thus minimizing their Bw advantage. |
 |
| This unit of hoplites were painted to be Athenians in the charging position to represent what happened at Marathon. My friend Mike was happy to use them in the Greek center. |
 |
| Another shot of the same unit charging. |
 |
| Nice aerial view of the initial set up. The figures are 1\72nd Zvezda, Hat and Italeri. |
 |
| First stand advance of the Greeks. This is the Greek left and Persian right. The Greek Ps would be eliminated fairly quickly. The Greek commander used them to absorb Bw fire which they heroically did. To win a DBABR battle elements defend as core are more valuable than the ones not. Ps are rarely core and so they were expendable in this game. |
 |
| Greek right, Persian left. The Persian Ps would defeat the Greek Ps opposite of it and check the hoplite unit, not once, but twice. It is very hard to do that in the rules but in my opinion the possibility has to be there that even the worst unit has some chance of success against their betters. |
 |
| I was the Persian player. At this point I'm thinking I have one shot at breaking through the Greek center that has been weakened to one rank of elements. |
 |
| On my turn I did move up my center. The small green die shows that one hoplite unit picked up a recoil from Bw fire. In order for the Persians to stand a chance in melees they have at partially fragment a Greek line of battle before closing. |
 |
| There is no way I'm stopping this steam roller although the Greek Ps would perish soon. |
 |
| The Persian left after defeating the Greek Ps. As stated above the Persian Ps on the flank would check that phalanx 2x before being destroyed. |
 |
| The clash in the center. Two Persian elements have suffered recoils and one Greek. |
 |
| My goal was to try and get past the powerful Greek flanks and smash the Greek center before my flanks were totally crushed. It was a simple and forlorn plan. |
 |
| My plan is being thwarted-note the 2 recoils on the Persian center\left. |
 |
| Here the Greek center has suffered two recoils and in fact the one of the right has 2. Being veteran they could absorb three before being destroyed. |
 |
| The large die keeps track of pips. The Greek left is about to roll over the Persian right. |
 |
| I was able to stabilize the Persian center for one turn and it gave me a "high tide" moment, literally, one moment. |
 |
| Recoils all over the place. When ordinary elements suffer two recoils they suffer a minus one to their CF. |
 |
| Not good, nearly all the elements in the Persian center have a recoil. |
 |
| The Persian center is collapsing but still managing to get a recoil on the Greeks here and there. |
 |
| The inevitable demise of the Persian left. |
 |
| The remnant of the Persian right. With no room to maneuver the Persian cavalry played no role in the game other than to occupy space and then head for the ships! |
 |
| Good shot of the center conflict with recoils on both sides. The Persians are about to be flanked however. Show over. |
 |
| The remnant on the Persian left. They are about to head for the ships too! |
 |
| Greek flanking results in the center. The two Persian units managed to destroy one core hoplite unit before getting flanked themselves. |
 |
| End game. The Greeks destroyed eight core units to the Persian one-a historical lop-sided victory and splendid time. |
2 comments:
This is a striking looking game. Well done!
Thanks Jonathan
Post a Comment