Showing posts with label DBA. Show all posts

Saturday, April 8, 2023

David's or Solomon's Hebrews

 A friend asked me to post some pictures of my 1\72 Hebrew Army. The figures are from the excellent Caesar set.

I organized the army initially for my version of DBA, although for looks purposes I like to use double stands. The lists I used were from DBA, Meshwesh and whatever else I could find at the time.

A few years ago there was a fan site for DBA that provided some basic paint guides. I used some of them for my army.

Chariots were a problem since Caesar, nor any one else made a 1\72 chariot for Hebrews. I reasoned that a Hebrew chariot probably was not much different than an Egyptian chariot or Mesopotamian type. I settled on the Caesar Mitannian set for the chariots.

The DBA lists allow for quite a few Hebrew variants between an early list and a late list. I settled for the list that seemed to be the army at the height of the Israelite united kingdom under David and Solomon.


Two of the Mitanni chariots. Very nice miniatures!

This isn't actually a unit. The set comes with biblical characters. On the left is Samson with Moses on the far right. My guess is the female character in the center is the only female judge in the Book of Judges. Deborah inspired Barak the Israelite general to wage a successful war against a Canaanite kingdom. To Deborah's side a priest uses a shofar (a horn) to call his countrymen to battle. A bodyguard of 3 spearman complete the little diorama.

This is my command chariot.

One list allowed for Phoenician (Tyre) archers. I think the three archers on the left are from the Caesar Philistine set. The other four are from the Hebrew set. Most lists allow Hebrew archers to be massed.

Philistines were a frequent enemy of the united kingdom but they also served as mercenaries under David and Solomon. The Philistine Caesar set is also an excellent set.

These are simply classified as light foot. Israelite armies were primarily militia and their arms and armor could vary quite a lot. On the far right is a slinger. I will be painting a unit of slingers as it was a common Hebrew weapon. I wish the set would have included a young David with a sling and a giant Goliath!

These figures were left over from the Mitanni chariot set. They serve as David's "might men" and whatever served as the small standing army under David or Solomon. Later Hebrew armies would look a bit like Babylonians or even Assyrians.

This figure was the only shielded figure included in the Caesar set with is too bad. Although militia (Gibborim) many would be equipped as light spearmen. The set as a whole is excellent and fills a niche. Most of poses could be used in the Jewish wars of the Maccabees and later in the revolts against Rome.


Friday, September 25, 2020

Celt Invasion of Greece 279 BC

We finally were able to get around the Covid plague and play an actual face-to-face game.  As documented elsewhere on this blog we use a set of rules called DBABR-that is, my version of DBA, which may or may not bear much resemblance to DBA depending on your point view.

Unless we are doing a pick up type game I like to adapt a Command and Colors Ancients scenario to the the game system.

A couple of features worth mentioning in my DBABR are the use of double stands to represent an element. This is done for the purpose of looks ad doesn't affect game play. We simply get to use 100 or more figures per side in a game.

Another feature that comes about because of the CCA scenarios is having more than 12 elements in your army. As you can see from the OB's below both sides exceeded the DBA norm.

The other feature is a morale system related to the number of recoils an element suffers. 

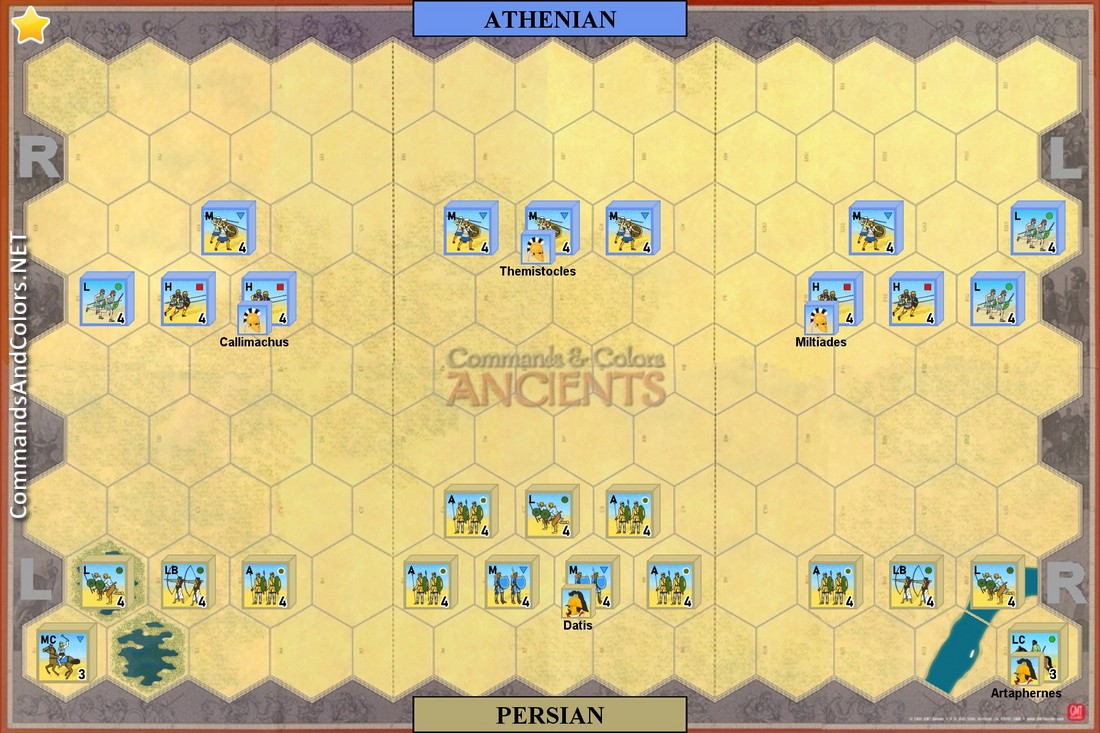
So, for those of you interested I've included the basics of the CCA scenario along with the OB I converted from the map. It's not that hard to equate the CCA counters with DBA elements after a little practice. The result is not exactly a historical reconstruction but it's more interesting than a pick up game


 Historical Background

In 279 BC a large Celtic (aka Gauls) army descended on Greece. Part of this force under the leadership of Bolgios attacked towards Macedonia. The Celts offered the King of Macedonia, the recently crowned Ptolemy Ceraunos (See Battle of Corupedium), peace terms in return for money. Ptolemy, confident in the once all conquering Macedonian troops, refused and offered battle. His army was soundly defeated and his head removed forcibly from his body by the victorious Celts.
The Macedonians would look to the Son of Demetrius, Antigonus Gonatus, to become their saviour (See Battle of Lysimacheia).

Taken from Ancients - Commands and Colors System website.
https://www.commandsandcolors.net/ancients/


OB Macedonian (Dice, die roll plus one) 


3 Ps (O)

1 Lh (O)

1 Kn (S) Companions

3 Pk (1 S Agema, 2 O)

3 Sp (O)

2 Ax (O)

1 El (S) Ptolemy Ceraunos

14 elements


Core: Pk, Sp, Kn =7


Must lose 8 elements including 3 core, Ptolemy counts as two elements


OB Celts


8 Wb (3 Wb are S noble soldurii, others O,) Brennus with Druids and one element of soldurii

2 Ax (O)

3 Cv (S) One is noble soldurii Akichorios

3 Ch (S) soldurii

2 Ps (O)

18 elements


Command Break Down


Brennus (die roll)


2 WB Soldurii

3 WB

2 CV

2 Ch

1 Ax

1 Ps

11 elements


Akichirios (die roll)

1 WB Soldurii

2 WB

1 CV Soldurii

1 Ch Soldurii

1 Ax

1 Ps

7 elements


Core: WB, Cv, Ch=14 elements


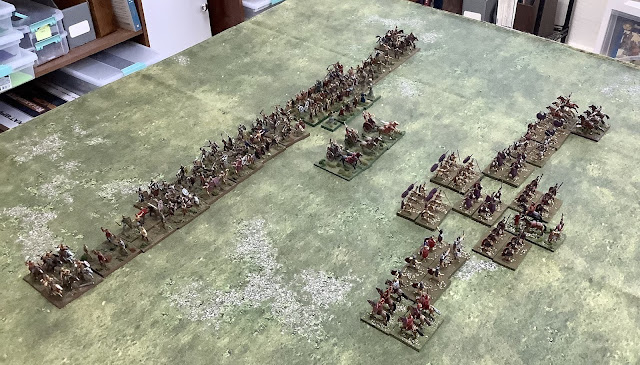
This picture has nothing to do with the game. I just wanted to line up my Celtic collection with my Polybian Roman collections.
.

Closer look, not a game 

Same here, just a closer look.

My Celts are my largest army for DBA. There are almost enough for other rule sets that use larger armies.

I'm in the process of expanding my Polybian Romans. Most of these are Hat but the Triarii are Newline. The expansion will include more Newline and shield transfers for all!

The other half of my Polybians thus far.

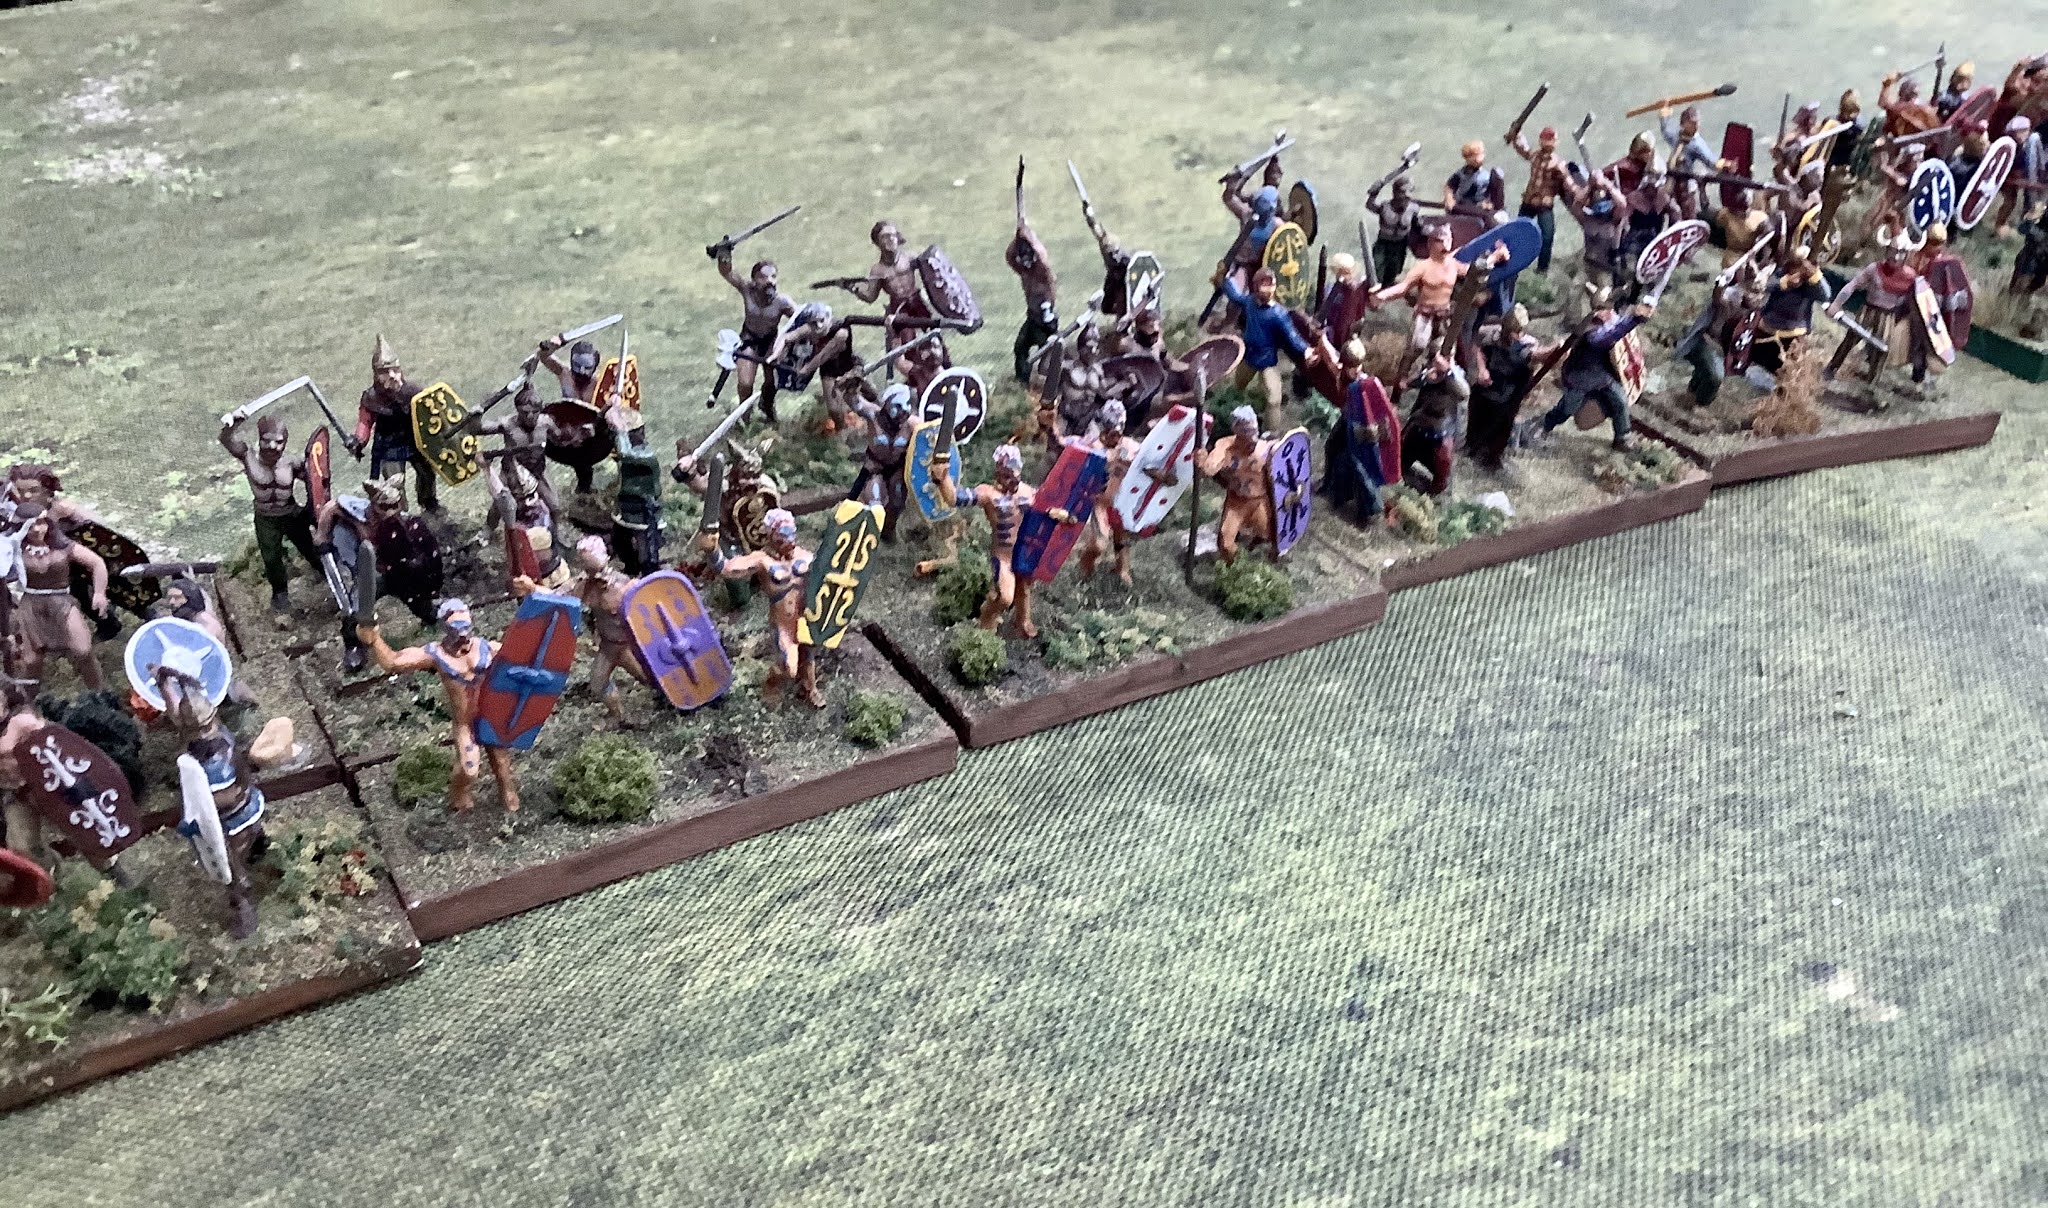
Finally a game picture...This is the far right flank of the Celts. One of the chariot elements has already been destroyed as it charged into the phalanx next to the elephant. I have an uncontrolled advance rule for war band types. Some times it works out nicely; other times not so much. The remaining chariot managed to hold it's own agains the Elephant. The Macedonians were heavily outnumbered so this flank remained relatively static until the end of the game. The Celts had the high ground here and didn't get another uncontrolled advance until very late. At that point Ptolemy Ceraunos died and the Macedonians were pretty much surrounded.

The Celtic horse would prevail against the peltast types they faced and outflank the phalanxes. 

Some of the Celt WB's were soldurii meaning nobles and their immediate retainers who were more heavily armored than normal. They had a better chance of holding their own against SP; but weaker versus pikes. Here two soldurii WB's and one normal WB have the opportunity to flank a SP phalanx, which they would do eventually.

This is right before the final peltast type unit gets swept away by the Celtic horse. One hoplite phalanx has disappeared leaving the second in peril. I avoided the pikes whenever possible but it was possible to get to the spear type units.

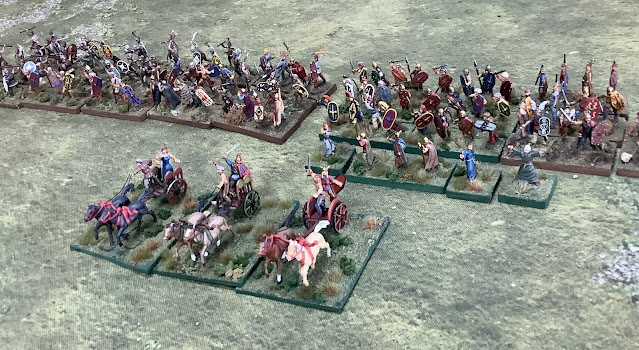
My friend Mike's command figure. In this game Ptolemy was part of the Elephant element so this fine figure just added great color to the game.

Celts should have a lot of Druids, both male and female. Their chants made bold warriors bolder just as they struck fear into the Macedonians. 

This is clearly the strongest part of the Macedonian line. There are pike phalanxes interspersed with spear phalanxes. I was fortunate to gain the high ground and not get an uncontrolled advance that would have taken me headlong into the bristling hedgehogs. As it was a couple of units did get caught and were crushed. Stay away from pikes!

Nice view of the Macedonian power. I held out just long enough to get around the Macedonian battle line and takeout enough core units to get the victory.

When Celt units did get a recoil the Macedonians were rarely in a position to capitalize on it.

Too many blood thirsty Celts and not enough Macedonians. Historically, that was the case. Ptolemy was far to confident that he could handle the invasion. Now his head decorates a Celtic spear.

The thick of it; but the game was decided on the flanks.


The CCA games are rarely balanced; nor do we think they should be. My opponent said he made the mistake of not pushing against the Celt center where he had the advantage. The idea would be risk the flanks to a more numerous enemy and hope you can crush the enemy center. It could have worked and probably was the only chance he had.

For my part the initial uncontrolled advances hurt me but for most of the game the Celts behaved-that is until the very end and it that case it helped me. Having absolute control of a WB type army is not much fun imo. I like a good dose of fog-of-war.

The game was a good time and opportunity to get out of the Covid rut.


Thursday, April 9, 2020

Spanish Army of the Punic Wars


I tend to do double bases for my DBA type armies for looks purposes. It usually does not matter for my modified rules to work well enough and looks a darn sight better than the single bases in my opinion.

One  of my long standing projects is do an individual army for each of the major players in the 2nd Punic War without having to "borrow" miniatures from one army to the next since they all more or less fought one another. 

Therefore, I have a separate Hannibal's Army that does not include Spanish from the army below. Perhaps I'll feature that army in a later post.

Below is sampling from my purely Spanish army from the 2nd Punic War. If it does not line up with what you know about DBA keep in mind that early DBA simply serves as a template for me rules. I've explained some of that elsewhere on this blog.

Iberian Light Infantry (Ps in DBa) (Orion) 
Command Unit by Hat
Iberian Infantry mounted as 3Ax for DBA (Hat)
A better shot of Iberian 3Ax infantry (Hat)
Another command type stand this time as 4Ax (Newline)
Iberian infantry as 4Ax. They are from the Orion set. It's a neat set although flash can be an issue.
Spanish Infantry by Newline mounted as 4Ax.
Heavy Cavalry (Cv in DBA) The center figure is Newline and the rest are Hat.
A better view
Spanish light cavalry (Lh in DBa) Hat

Saturday, January 11, 2020

Marathon DBABR


DBABR stands for DBA followed by my initials. DBABR bears little resemblance to DBA 3.0 as my version evolved from a solo version of DBA 1.0 authored by my friend Jim. I simply added a few things like double sized elements for the purposes of looks and some morale rules to avoid endless recoils. If you are interested in the changes you can find them at this link-An Explanation of DBABR

I prefer doing historical battles when possible and generally use the excellent maps found at Command and Colors Ancients map scenarios.

In the case of this game I used  the Don Clarke's Marathon variant found at the site. I convert the CCA counters to corresponding DBA elements. My friend Mike who supplied all the figures for the game set up his table and we played the game.

The letters in the OB refer to morale. L is for levy, O is for ordinary and V is for veteran.  Morale is tied to the number of recoils a unit can endure before destruction. The other standard rules for destroying elements still apply.

The Order of Battle looked like this:

Greeks

Callimachus Greek Right full die roll pips to move)

3-Sp, V
1-Ps, O

Themistocles  Greek center, full die roll pips to move

3-Sp, V

Note:We decided prior to the game to play the center Greek in single rank since historically that's what they did. In the game this closed the gaps on the map. Although we use the maps we do adjust somewhat for the game board and\or historical reasons. Nevertheless, the maps are excellent templates for a historical battle.

Miltiades Greek left, full die roll pips to move

3-Sp, V
2-Ps, O

The distance between the two armies was reduced from our usual 18" to 12" to facilitate the surprise charge by the Athenians. The full die rolls for movement pips also helped the Greeks to close in a more coordinated fashion.

Persians

Unkown Commander Persian left, 1\2 die roll pips to move

1-LtSp\BW, O
1-Bw, L
1-Ps, O
1-Cv, V

Datis Persian Center, full die roll pips to move

4-Lt\Sp, O
2-LtSp, O
1-Ps

Ataphernes Persian right, 1\2 die roll pips to move

1-LtSp\BW, O
1-Bw, L
1-Ps, O
1-Lh, V

Note: The CCA categories do not translate perfectly to DBA elements, so educated, subjective guesses had to be made.This was a difficult game to have play balance. When I set up a historical scenario I want to use what history I can but at the same time give the side with less advantage at least a 33% of achieving victory. In this case that was very difficult to do given there was no room for the Persians to maneuver, the distance between the battle lines was only 12" and the Greek morale was vastly superior to the Persian. All these modifiers were in my opinion accurate but probably reduced the Persian side's ability to win to 16% rather than my rule of thumb 33%.

Nevertheless, the game was a lot of fun and the result very historical and the beer tasty!

I will use the pictures below to explain some the action.


The initial set up. The Persian left borders the sea, the right borders hills and the terrain to the rear is swampy. Clearly, the Persians had no idea the Greeks would attack.

Another view of the initial set up. The single stands of the Greek center are clearly visible. The Persian center would have one shot to break through the Greek center before the stronger Greek flanks would make short work of the weak Persian flanks.
Neat shot of the Greek center who would have to hold the Persian center.
The Persians recognize the danger and prepare to advance thus minimizing their Bw advantage.
This unit of hoplites were painted to be Athenians in the charging position to represent what happened at Marathon. My friend Mike was happy to use them in the Greek center.
Another shot of the same unit charging.
Nice aerial view of the initial set up. The figures are 1\72nd Zvezda, Hat and Italeri.
First stand advance of the Greeks. This is the Greek left and Persian right. The Greek Ps would be eliminated fairly quickly. The Greek commander used them to absorb Bw fire which they heroically did. To win a DBABR battle elements defend as core are more valuable than the ones not. Ps are rarely core and so they were expendable in this game.
Greek right, Persian left. The Persian Ps would defeat the Greek Ps opposite of it and check the hoplite unit, not once, but twice. It is very hard to do that in the rules but in my opinion the possibility has to be there that even the worst unit has some chance of success against their betters.
I was the Persian player. At this point  I'm thinking I have one shot at breaking through the Greek center that has been weakened to one rank of elements. 
On my turn I did move up my center. The small green die shows that one hoplite unit picked up a recoil from Bw fire. In order for the Persians to stand a chance in melees they have at partially fragment a Greek line of battle before closing.
There is no way I'm stopping this steam roller although the Greek Ps would perish soon.
The Persian left after defeating the Greek Ps. As stated above the Persian Ps on the flank would check that phalanx 2x before being destroyed. 
The clash in the center. Two Persian elements have suffered recoils and one Greek.
My goal was to try and get past the powerful Greek flanks and smash the Greek center before my flanks were totally crushed. It was a simple and forlorn plan.
My plan is being thwarted-note the 2 recoils on the Persian center\left.
Here the Greek center has suffered two recoils and in fact the one of the right has 2. Being veteran they could absorb three before being destroyed. 
The large die keeps track of pips. The Greek left is about to roll over the Persian right.
I was able to stabilize the Persian center for one turn and it gave me a "high tide" moment, literally, one moment.
Recoils all over the place. When ordinary elements suffer two recoils they suffer a minus one to their CF.
Not good, nearly all the elements in the Persian center have a recoil.
The Persian center is collapsing but still managing to get a recoil on the Greeks here and there.
The inevitable demise of the Persian left.
The remnant of the Persian right. With no room to maneuver the Persian cavalry played no role in the game other than to occupy space and then head for the ships! 
Good shot of the center conflict with recoils on both sides. The Persians are about to be flanked however. Show over.
The remnant on the Persian left. They are about to head for the ships too!
Greek flanking results in the center. The two Persian units managed to destroy one core hoplite unit before getting flanked themselves.
End game. The Greeks destroyed eight core units to the Persian one-a historical lop-sided victory and splendid time.