Showing posts with label Hat. Show all posts

Friday, October 18, 2024

Late Romans vs Sassanid Persians (Lion Rampant Variant)


The pictures are from a recent game between Late Romans and Sassanid Persians. My friend a I used a variant of Lion Rampant.

The scenario was an adaptation of one in Lion Rampant. The Romans had to cross the gaming board (4' by 4') diagonally with Persians on both sides.

It turned out very one-sided. The Persian heavy cavalry were all double-armed with bows. The Persian infantry consisted of two units, one of which was levies and the other bow-armed. The Sassanid cataphracts were not double-armed.

The Romans had two units of heavy cavalry, one unit of javelin cavalry, one of Roman horse archers, and one of mercenary Huns. They also had one unit of Auxlia and one of Legionaries, neither of which were split units that featured archers. The third Roman infantry unit was archers. They did serve to protect the other Roman infantry units.

The Romans (me) suffered from horrendous dice. We use the one activation failure rule, which determines whether you are done for the turn. Many do not like this rule, but I prefer the uncertainty associated with it, even though I had three consecutive turns that paralyzed an army whose goal was to exit the board! 

I have no complaints.

My most effective unit was the Roman light cavalry with javelins. When they could fire and move, they were very effective. The Hun unit got shot to pieces early, and the Roman horse archers did little better.

The Roman heavy cavalry started out well, giving as good as they got, but the paralysis came into play, giving the Persian heavy cavalry ample opportunity to shoot with impunity.

The Roman infantry, slow to begin with compared to the cavalry, basically occupied space that was not useless but accomplished little, given the paralysis. 

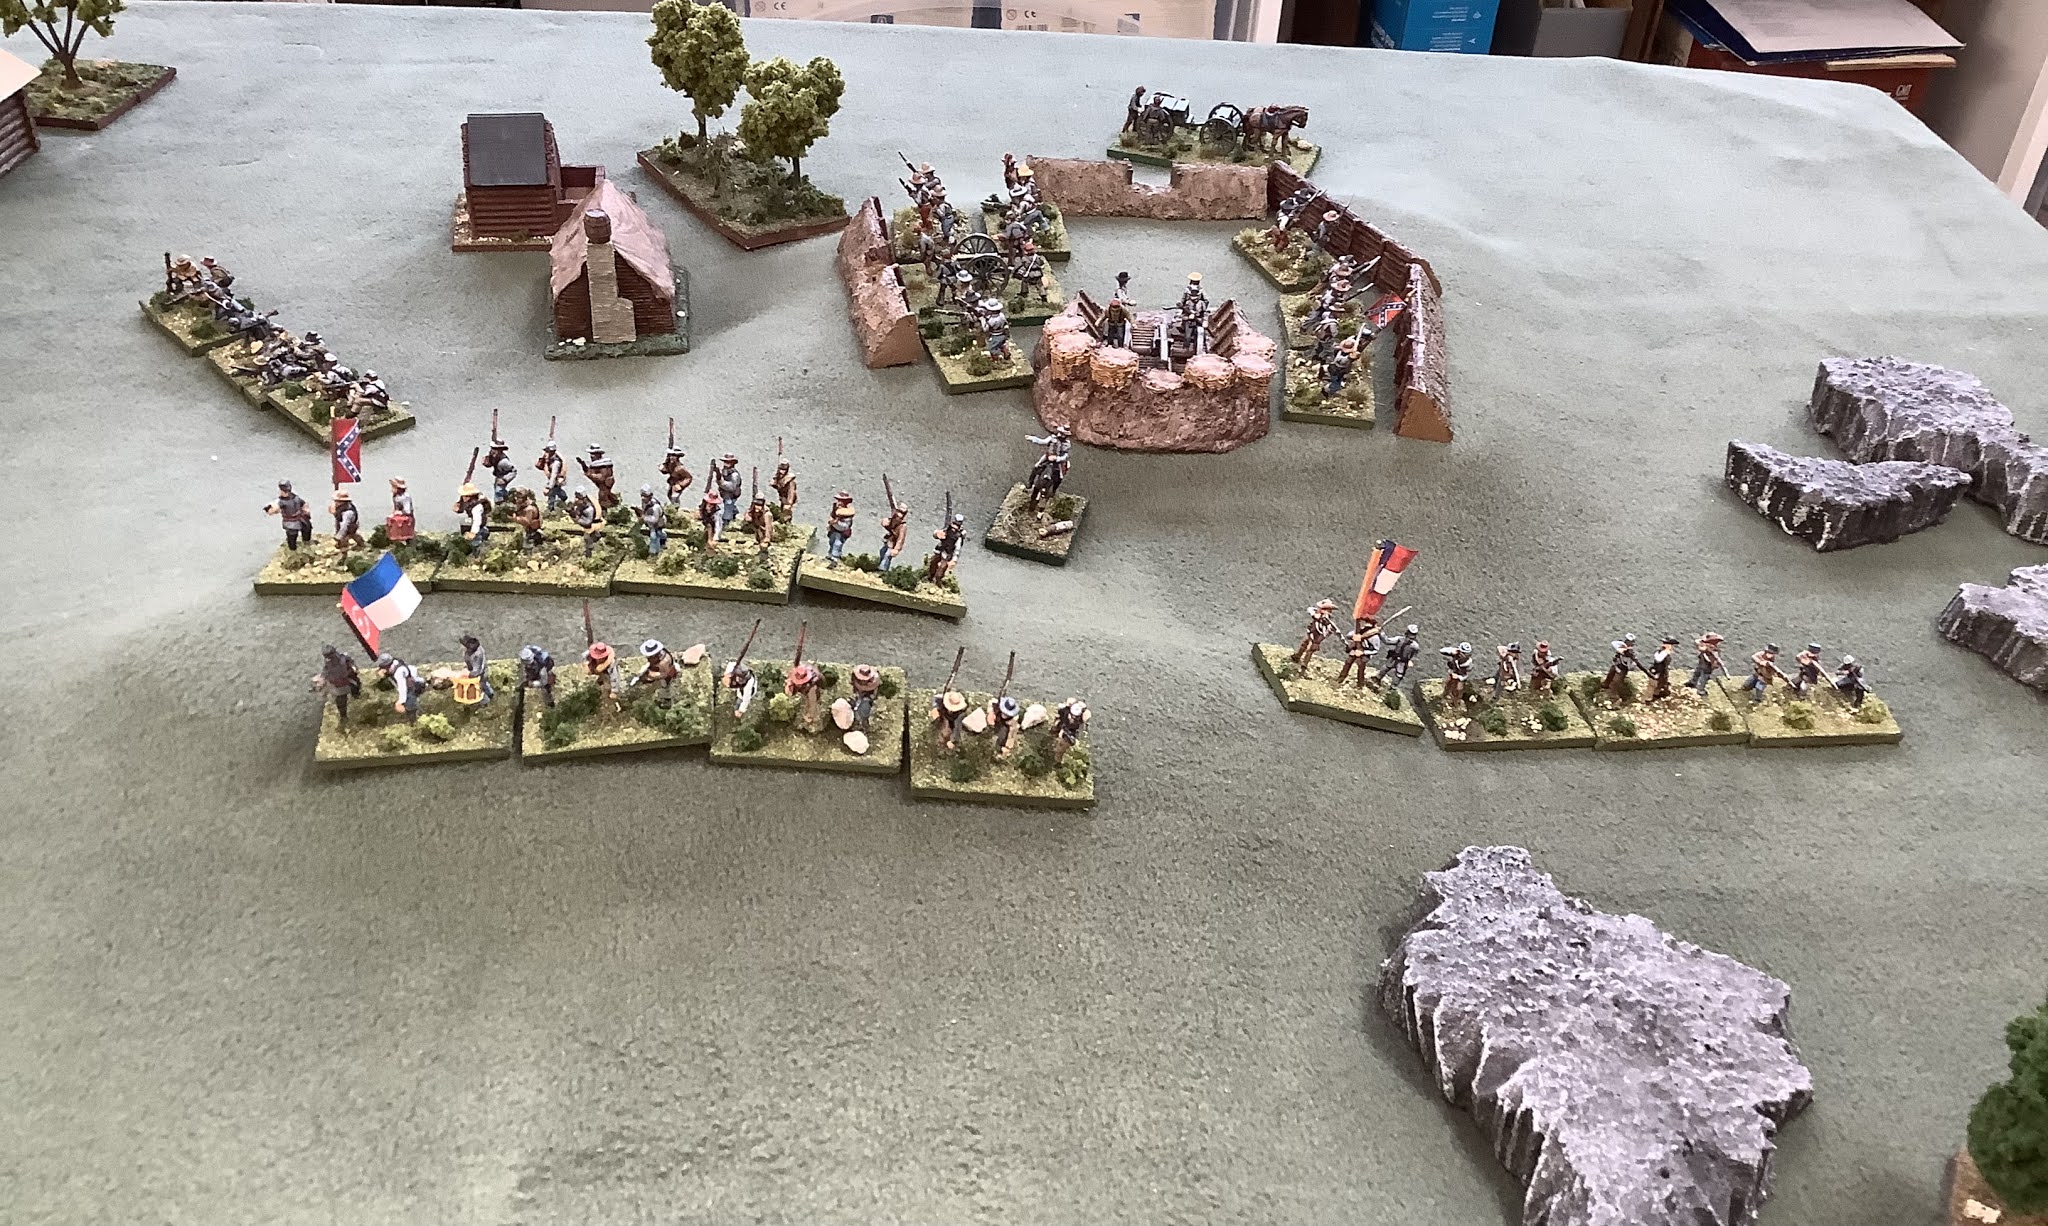
My friend Jim commanded his Sassanids (superb paint jobs!). He placed all his light troops (protected by a stream) on one flank and the heavy units on the other.

I threaded the needle between the two but never gained much traction. In retrospect, trying to force the stream may have been the better option, but that would have meant enduring the Persian heavy cavalry on the other flank. I thought it better to try and destroy the heavier troops before the lighter troops could make much of a difference.

Whether we win or lose is not really important. You try to attain the victory conditions, but in the end, it's all about a fun set of rules and a parade of finely painted miniatures.

The scale of the figures for the game was 1\72, and all are plastics from Zvezda, Hat and Italeri.

Lion Rampant is a fine set of rules, in my opinion. Ordinarily, I do not like picking a game force using a point system, but when my opponent is my friend, Jim, it works very well since neither of us suffers from the all-too-common temptation to field super armies. In other words, upgrades are rare.

However, within Lion Rampant, there are just enough upgrades, especially regarding weapons, to allow a gamer to field a force suitable for whatever the enemy is.

In that sense, a Late Roman army was far more versatile than a Sassanid one.

After the game, I painted up another unit of Auxilia, but this time it's a split unit ;-)

Enjoy the pictures!

Roman Auxlia (Italeri)
Roman Heavy Cavalry (Hat)
Hun Mercenaries (Hat)
Roman Legionnaires (Italeri)
Roman Lt.  Javelin Cavalry (Hat)
Roman Auxiliary Archers (Italeri)
Two units of Roman Heavy Cavalry (Hat)

Sassanid Cataphracts (Zvezda)
Sassanid Heavy Cavalry (Zvezda)

Sassanid Heavy Cavalry (Zvezda)
Sassanid Lt. Cavalry Horse Archers (Hat)
Sassanid Levy Infantry (Hat)
Sassanid Lt. Infantry Archers (Hat)
Sassanid Heavy Cavalry (Zvezda)
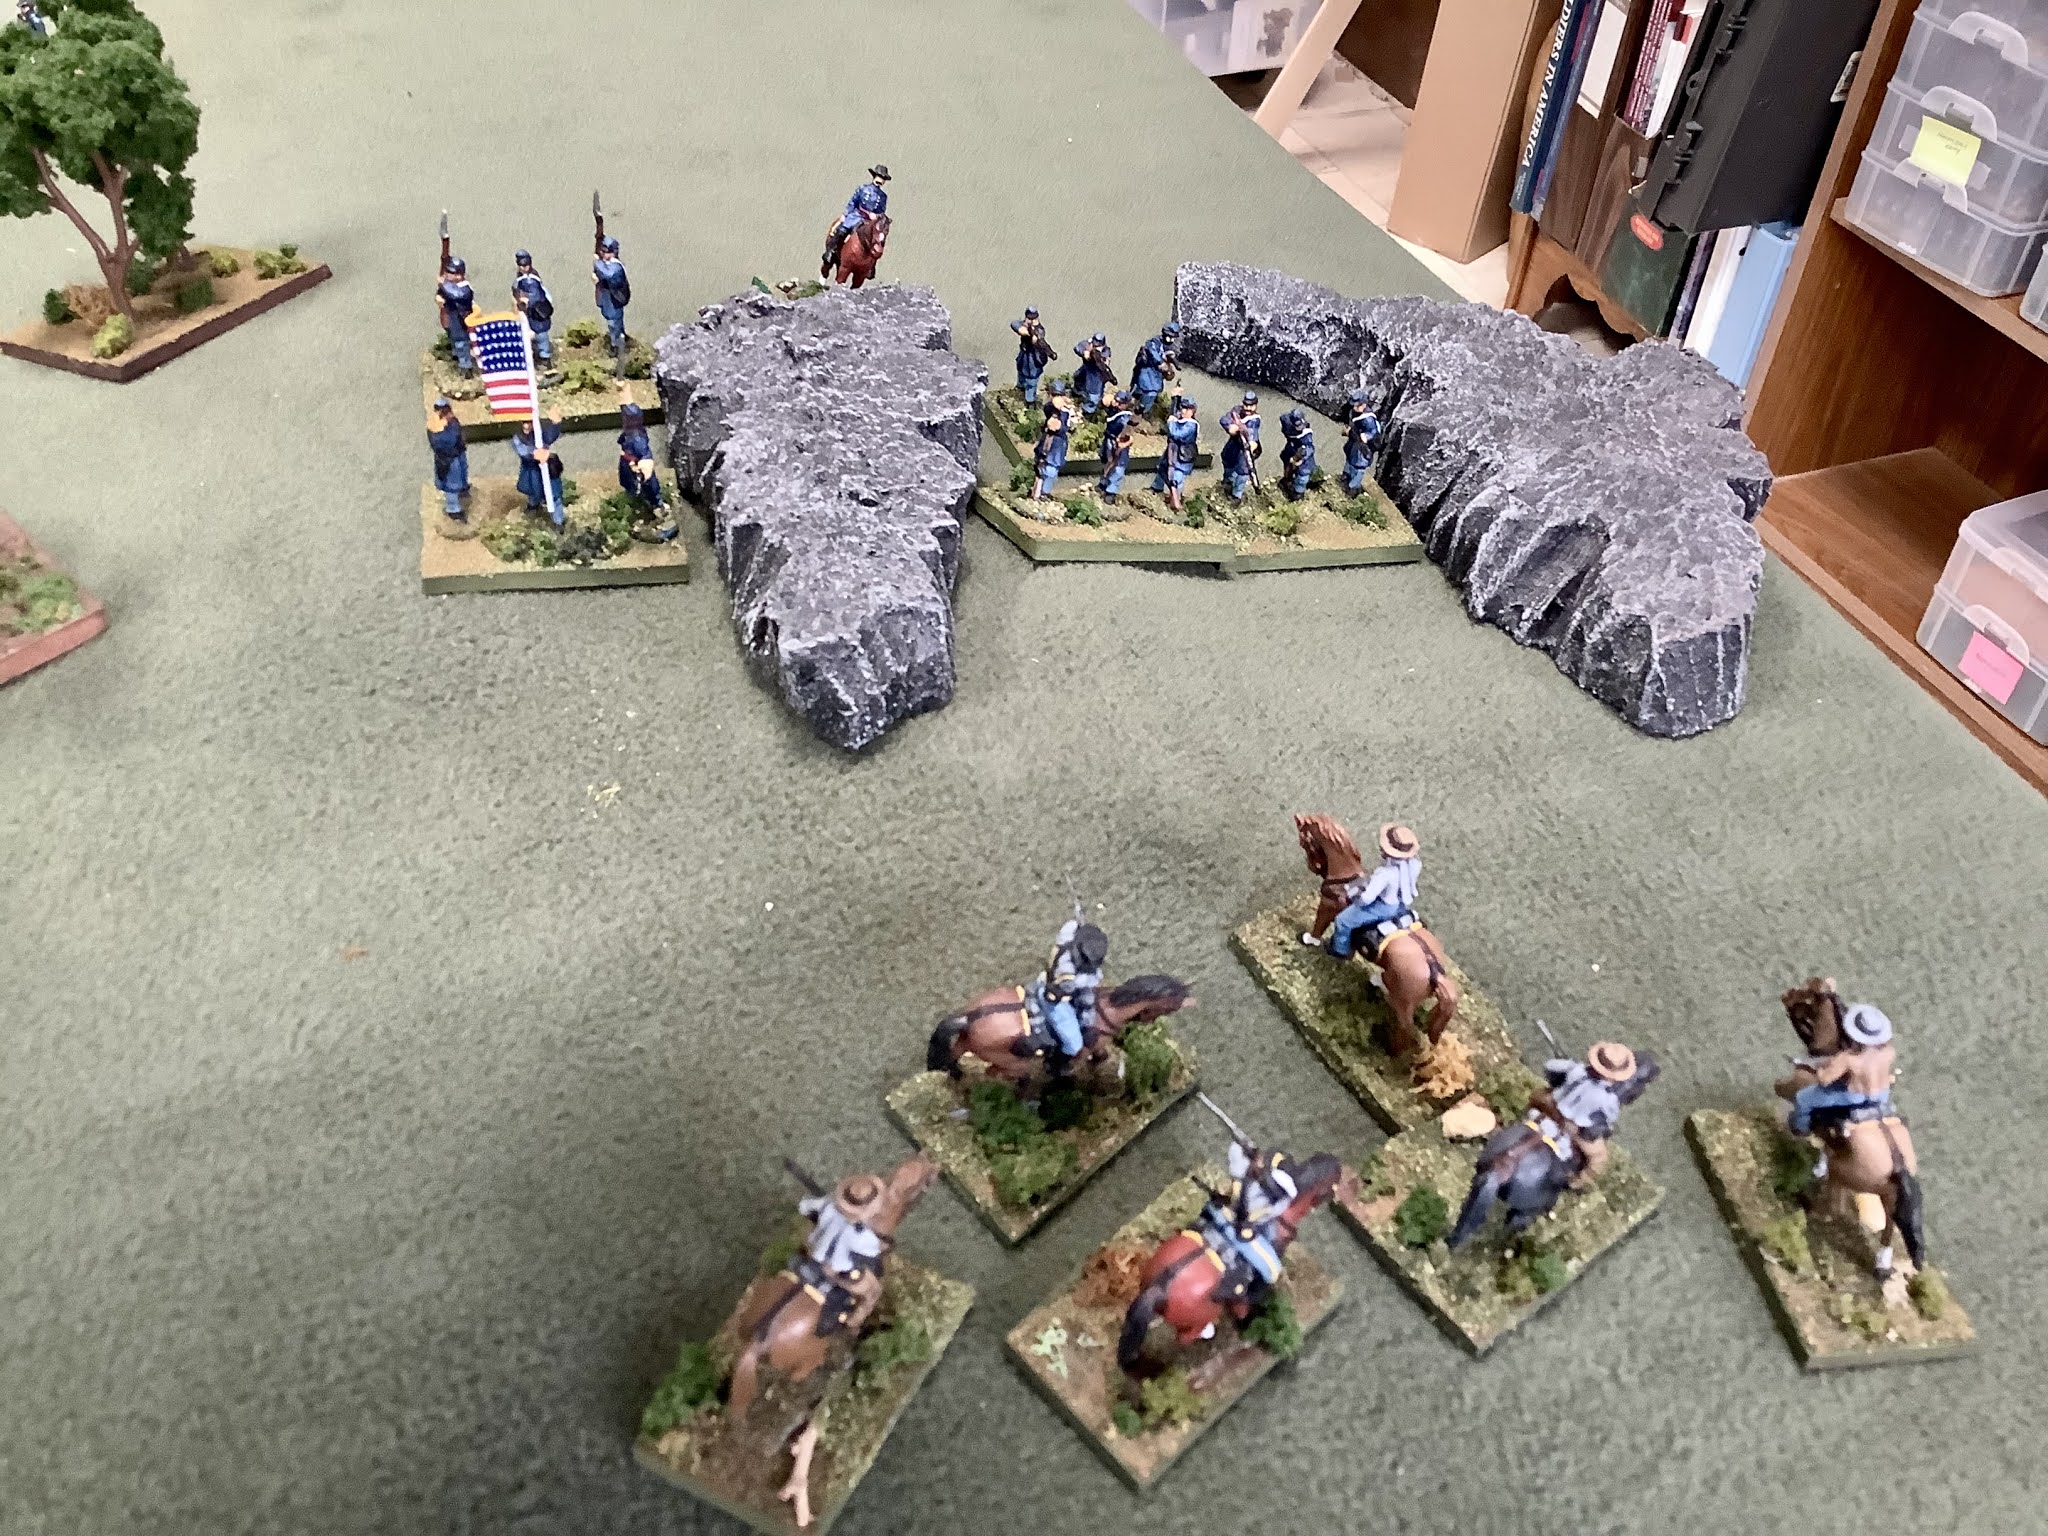
Roman Light Cavalry attempted to flank the Sassinids.
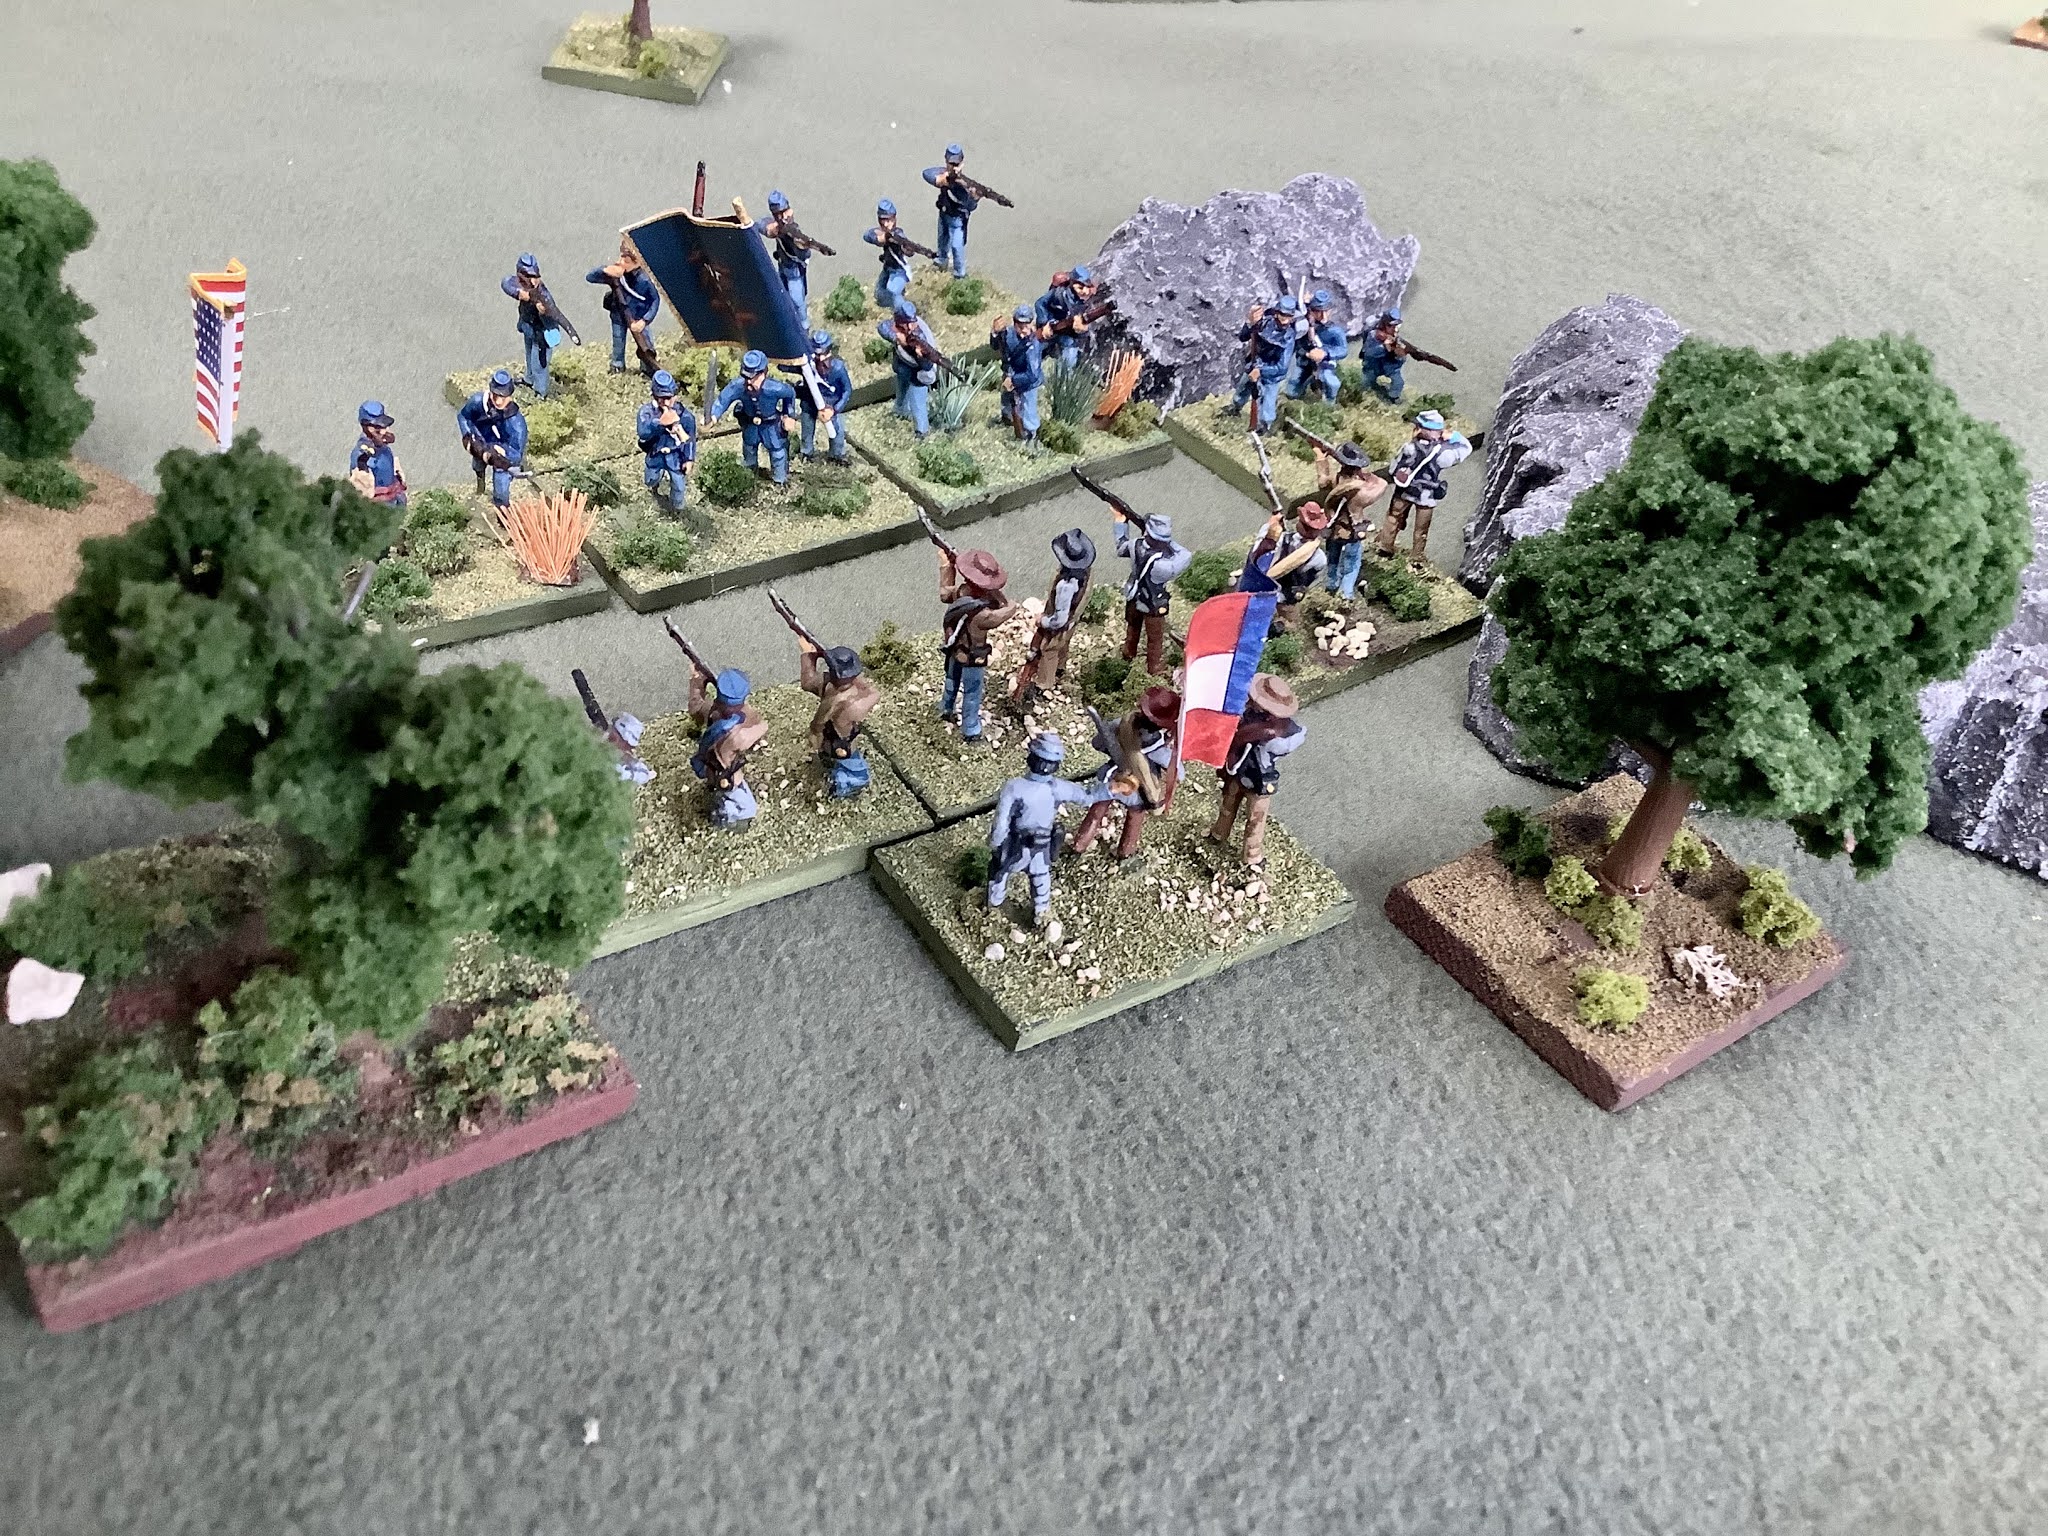
Roman Heavy Cavalry attempted to hold the hill.
Roman Cavalry attempt to break out!

Friday, August 2, 2024

Romans and Macedonians Collections


My interest in the Macedonian and Punic Wars dates back to the publication of Phil Barker's book of the same name. Back in those days 25mm metal Minifigs were standard but were supplemented by other manufacturers who did figures in 25mm scale.

My first armies are long gone (sadly). I've spent the last ten years giving the period new life with as many vintage figures as I could find, as long as they were compatible with the numerous plastic 1\72 sets appropriate to the period in question.

The intended rules are a fan-created variant drawn from Lion Rampant. 

Back in the day, I had a number of Macedonian Brescia Miniatures. I was fortunate to find quite a few on eBay and they became the nucleus of my late Macedonian Army.

As you can see from the pictures below, they and the Polybian Romans have been supplemented by HAT and the excellent Newline figures in 20mm.

Brescia were always small, 25mm, compared to the chunkier Minifigs and Hinchcliffe, so they fit well with 20-22mm figures in separate units.

These were the standard Macedonian Phalanx by Brescia. They were not fancy, having a leather jerkin rather than metal. I always thought they were perfect for a late Macedonian army.

These are Brescia Cretan archers. By today's standards a bit crude but I love them.

I supplemented my phalanx with the excellent plastic set from HAT. With HAT you get a great assortment of styles. What I like about the HAT set is the ability to put armored phalangites in the front rank and lesser armored behind.

These are Brescia Hypaspists. The Brescia Macedonian line was intended to be Alexander's army. In my army, I use the figure to represent the transition from a lightly armed peltast to a more heavily armed type capable of standing in the line of battle. They are painted up to represent an elite.

Brescia also made an armored phalangite with a crested helmet. I got just enough to make an agema type unit.

These figures are HAT cobbled together from Alexander's Companions and Thessalian sets. They represent standard heavy cavalry in a late Macedonian Army.

Brescia peltasts. Based on Barker's book, I painted them up as Thracians. He recommended a black tunic for Thracians who served as mercenaries in a late Macedonian army.

These are my "wild" Thracians, figures by Newline. When it comes to 20mm scale, Newline figures are simply excellent. I have an unpainted unit of Newline phalanx waiting in the wings!

These are Minifigs given to me by a friend. I use them for a command unit.

Newline Triarii for my Polybian Romans

Newline Hastatus

Newline Principes

HAT Hastatus. I did these before I became aware of Newline. They are early HAT sculpts and not as good as other ancient figures done by HAT later. Still, they are pretty cool!

HAT Principes

HAT Triarii

A HAT command stand and a Newline command stand.

I thought the Strelets Velites were very cool, so I did a unit.

HAT Velites

Newline Roman Heavy Cavalry

HAT Italian Allies

I have more units that didn't make the photo shoot, but the pics are a pretty good sample of two armies.

Friday, March 1, 2024

Rebels and Patriots Union Forces in 1\72

 This is the counterpart to my last post, which featured Confederate forces.  The majority of figures used for both collections are 1\72 plastics from Italeri, Airfix, IMEX and Hat. 

My metal Union forces include some excellent 20mm sculpts from Newline. Also featured are some old Musket Miniatures and a few RSM figures.

Both armies are organized for Rebels and Patriots by Osprey. 

Command stands for Hat's Union Cavalry skirmishing.

Newline mounted cavalry painted as US Regulars. The dismounted figures are Musket Miniatures marketed as 22mm back in the day.

My other Newline unit, this time the dismounted figures are also Newline. I like a lot of figure lines but Newline is at the top of the list for 20mm metals.

Hat dismounted cavalry from the Union Cavalry skirmishing set.

Italeri is near the top when it comes to 1\72 plastics. These are from their Union Cavalry set.

IMEX makes a set of Union Cavalry (or Confederate since the figures are the same). The mounted figures have a limited utility value since they are all firing from the saddle. The dismounted figures above are unique because they feature the very rare Colt pistol\carbine. They are among my favorites!

Hat Union Cavalry (mtd). Carbines and revolvers are much in evidence. Excellent set by Hat.

Airfix artillery crews with Musket Miniatures Napoleons.

Italeri Union Infantry (NY Regiments) Command figures are from Newline.

The 26th Wisconsin was a "Sigel Regiment." Sigel Regiments were raised in 1862 from the heavy German areas of Wisconsin and Ohio (and other areas or cities like St. Louis, MO). The figures are Airfix and I painted them up before the Italeri.

Italeri Infantry on skirmish stands.


The 5th New York was named Duryea's Zouaves. One unit is organized as line infantry for Rebels and Patriots and the 12 figures unit is organized as Light Infantry. Both units are a mix of Italeri, Hat and Musket Miniatures. Any Union collection must have at least one Zouave unit!


Sunday, May 16, 2021

Solo ACW-Battle of Allegheny Mountain, Dec. 13th, 1861

 I had a little extra time so I brought out my home grown ACW rules that I call "Brigadier." The inspiration for the rules was from two sets of rules titled Rally Around the Flag. The first set came out in the 1970s or so while the second came out 30 years later. I took the ideas from both sets that I found useful in order to produce a solo game, although, they would work just fine with two players.

My game board is small at 4' by 4' and the figure scale is 20-24mm. Games on my board usually have 2 brigades per side at the most, with each brigade having between 3-6 units included.

I use a command point activation system (CPs) that limit how many actions units within a brigade can perform in a turn. Brigade commanders dice each turn to see if their base CP allowance is modified. Wild cards allow for interesting twists in the game.

Regiment sizes range from 4 bases to 8 bases with 6 being average. Some special units have only two bases.

This is the second time I'm play testing my rules. I selected a scenario from the Potomac Wargame Club , Across a Deadly Field, titled The Battle of Allegheny Mountain, an early war battle. 

I use a dark green "blanket" from the fabric store to cover hills. This battle was fought basically on a mountain so I added rocky out crops for effect. It is my view that most ACW battles were fought over terrain with gave limited visibility. A situation like Pickett's charge was probably a rarity.

I think my game table captured the effect I was looking for. 

Historically, the battle was a bust for the Union and so was the game! I played as the Union player while the Rebs were the AI.

Although, the game is solo, my AI is not truly fully automated. I always play the weaker side and tend to stack the deck with the AI, but when it comes to making AI decisions, I make the most likely and when in doubt dice for the decision. It works well. I have a good "feel" for the period and I've had interesting and fun results.

Combat is resolved on the basis of total base removal, a step down system that works for me.

The Union's orders were to clear the heights and take the camp\fort-a tall, not very realistic order, but that's the way it was!

The OB for the game was:

CSA

Colonel Edward Johnson (who would be nicknamed "Allegheny Johnson" for his victory) +1 competence

12th GA, Veteran, RM, 6 bases

Reger's Va. Bn., Average, RM, 4 bases

9th VA Bn., Average, SB, 4 bases

31st VA., Average, SB, 6 bases

52nd VA., Ross's Bn., SB, 3 bases

Lee's VA., Battery, 6lb SB, 2 gun models, Green (in camp\fort)

Dabney's Cavalry, Green, BLC, 2 bases

USA

Brigadier Robert Milroy, average competence in this battle, later pounded by Stonewall Jackson in the Valley Campaign)

13th IN, Average, RM, 4 bases

25th OH, Green, RM, 6 bases

32nd OH, Green, RM, 6 bases

Bracken's Cavalry, Green, BLC, 2 bases

Colonel Gideon Moody's Command, average competence

9th IN, Green, RM, 6 bases

2nd W. VA., Green, 4 bases

One of the advantages of a solo game is you can take detailed notes of the the action. I played the game over two days, taking the time to document the major actions. Although the game only lasted four turns the card sequence and variables made for a lot going on in those four turns!

Game summary, more detail with picture captions (cards determine sequence)

Turn 1: Moody's 9th IN and 2nd W. VA advanced on Union left; Dabney's cavalry reacts, moves and fires on 2nd W. VA getting a lucky hit. 2nd VA survives morale toss. Dabney's cavalry gets to move again to cover this time and fires, but misses. 9th VA Btn advances. Milroy confused, orders 25th and 32nd Ohio to advance on Union right. 25th Ohio gets to advance again into cover, but target is obscure and misses.  Reger's VA Bn. moves into cover opposite 25th OH but also misses. Johnson was confident this turn. Action on both flanks with the Union getting slightly the worst of it.

Turn 2: Moody confident, 2nd W.VA advances into cover, 9th IN wheels to fire at Dabney's cavalry but no effect. Dabney's cavalry fires and moves (to cover) getting a hit on the 9th IN. 9th IN survives morale toss. Johnson confident, 31st VA wheels and fires at 2nd W.VA but NE, Reger's VA. Bn fires on 25th Ohio,gets hit and 25th OH skedaddles. Milroy "bumbling about" but moves to rally 25th OH and succeeds. Reger's Va Bn moves and fires on 25th OH again and the 25th skedaddles again. Moody's command "gets their dander up" and charges ahead firing at 31st VA but NE. 2nd W.VA ends up in a bad position, Union right badly pushed back by Reger.

Turn 3: 2nd W. VA withdraws back into cover, fires at 31st VA but NE. 12th GA (rated vet) advances out of fortification to support Reger sensing victory on CSA left. Johnson confused but enough CP to fire the 31st VA at 2nd W. VA scoring a hit. 2nd W. VA survives morale but is at 1\2 strength. Milroy's dander is up, rallies 25th OH again, 32nd OH charges and fires at 31st VA scoring a hit, 31st VA skedaddles. 13th IN advances. Moody indecisive orders 2nd W.VA out of harms way. 12th GA advances to threaten Union center.  CSA general advance sensing victory but 31st VA sets the advance back a bit.

Turn 4: Moody confident, 2nd W.Va. continues to move out of harms way, 9th IN fires at Dabney's cavalry to NE. Milroy stable, 32nd OH wheels, flanks and fires at 9th Va Bn and hits, 9th Va Bn, passes morale. 25th OH fires at Reger's Bn, NE. Bracken's cavalry moves to support faltering Union center. 12th GA fires at 13th IN and hits, 13th IN passes morale toss, 13th IN fires at 12th GA NE., 12th GA charges 13th IN inflicts one hit, 13th IN misses, melee continues for three sequences before 13th IN skedaddles. Milroy moves to rally 13 IN and rallies the badly battered unit. Johnson rallies the 31st VA, 12th GA poised to smash remnants of Union center while Reger presses on Union left. Confederate right is stable and could advance on Union left. The Federal forces cannot possibly obtain the victory conditions at this point and withdraw. Union loses 8 bases to the Confederate 2 bases.

Nice view of the Confederate initial deployment

Union initial deployment. The skylight is messing with my lighting! 

The 25th and 32nd Ohio. The 25th will advance to the cover directly ahead. Reger's Va Bn is opposite of them headed in the same direction.

The Union left and left center. The unit in the lead on the far right of the picture is the hapless 2nd W. VA. 

Most of the Confederate units patiently wait.

The nasty fight in the cover between Reger's VA Bn and the 25th OH. The OH boys skedaddle 2x from the intense fire from  Reger's VA Bn.

Dabney's CSA cavalry are content to skirmish with the 9th IN.

Reger's VA Bn cracks opens the Union right.

The 2nd W. VA is in a tough spot as the 31st VA bears down on them!

Dabney's CSA cavalry lets the 9th IN have the position (wisely).

The 13th IN routs the 31st VA in the only bright spot on the Union side.

The 9th IN is content to hold their position while the rest of the Union army is n trouble.

The 13th IN cannot follow up the rout of the 31st VA.

Reger's VA Bn really got things going for the South!

This picture captures the rolling terrain of the mountain. Most of the fire fights were at very close range due to sighting restrictions.

The veteran 12th GA delivers the final blow and is poised to roll up the Union center.

A rallied 31st VA and 9th VA Btn are ready to deal with the 13th IN who are very much alone!