In September of 2019 my wife and I traveled to South Carolina to visit her sister. While there we took in some Civil War sites which included Fort Sumter. On the way home we stopped in Kentucky to visit the largest Civil War battlefield in the state, Perryville.
I plan to discuss the visit to Perryville along with the excellent book that I purchased and then read about the battle on my other blog. The book is Kenneth W. Noe's,
Perryville-The Grand Havoc of Battle. I also purchased from the visitor center at Perryville, Stuart W. Sandler's,
Maney's Confederate Brigade at the Battle of Perryville.
Sandler's book is a in-depth study of one Confederate brigade at the Battle of Perryville. It's a Civil War nerd's dream of detail and research crammed into 170 pages or so. It's especially valuable to the war-gamer who wishes to focus on a single brigade's contributions in a particular battle.
After the introductory pictures shown below I'll describe how I used the material in the book to recreate in simulation form the actions of Maney's Brigade at the Battle of Perryville
 |
| An excellent map from Civil War Trust showing the movements of the armies that ended up in mid-state Kentucky. |
 |
| The visitor center at the Perryville battlefield. I believe the staff member told me they were planning a larger facility. For the size, this one is very good and it features a museum relevant to the battle. |
 |
| The cost. Most of the Confederate dead are unknown and were buried in a mass grave. This marker is dedicated to Sgt. Harris Cope, 16th Tennessee |
 |
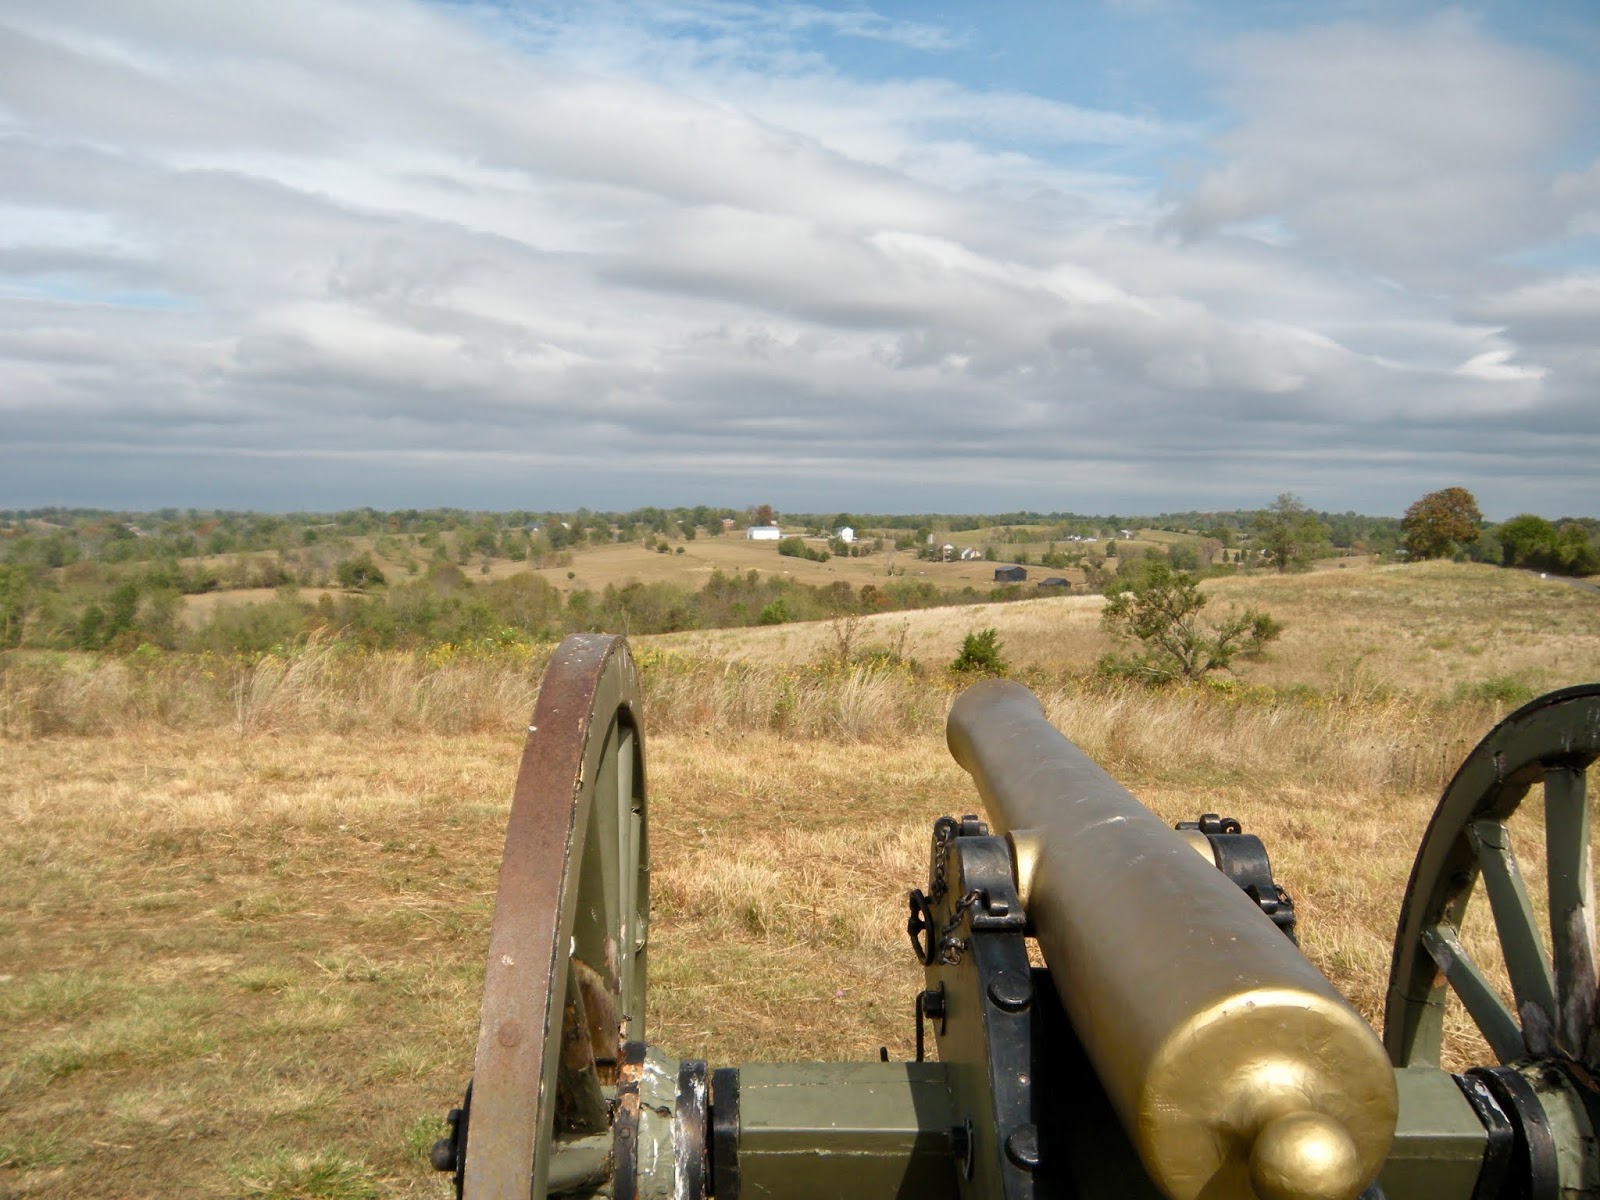
| The typical terrain of central Kentucky featuring rolling hills. |
 |
| This incline is steep. Maney's Brigade was tasked with reaching the top which was held by a Union battery and infantry. |
 |
| At the visitor center they tell you most of the battlefield is "as is" meaning crops and grasses were high and along with the hilly terrain visibility was limited. |
 |
| If you take the extensive walking tour plaques like this one describe what was going on. The plaques are well done and feature numerous quotes by the participants. |
 |
| A better view of the rolling terrain. Artillery batteries could often see a long way but often did not have a clear view of a target due to the dips in the ground. |
 |
| 12lb Napoleon stands guard on one of hills. |
I tried to reproduce the effect of the terrain on my 4' by 4' game board. The rules we used were Rebels and Patriots. To reproduce the actions of a little more than a brigade on a side in a small space I had to fudge the scale while using the rules pretty much as is.
In this game a unit represented a regiment. As you can see from the OB all infantry units had either 18 figures or 12 figures. The rules feature units for 6 figure units but I didn't include any. I also use two gun models for a battery for looks purposes, It does not have any effect on a gun's profile meaning two models fire as one gun. It seemed to work fine.
I gave each side officers that improved discipline within 12". I did not use the honor system in the rules.
Close order and first fire were eliminated from the game since the battle was well in progress by the time Maney's brigade reached this point the action. Range was also restricted to 6" for close 12" for long. The artillery had a 24" range. Part of the reason for this is the side of the game board but the other reason is the broken ground of North America.
Civil War re-enactors often do "impressions" of a real person. This is my impression of the role Maney's Brigade played in the battle. It is not exact-only an impression and it was a lot of fun.
Only the discipline modifiers were used from the unit profiles.
CSA OB
Maney's Brigade
41st GA, 18 models, Discipline=0
21st TN, 18 models, Discipline=+1
6th TN, 18 models, Discipline =+1
9th TN, 18 models, Discipline =+1
1st TN, 18 models, Discipline=+1
Turner's Battery, Discipline=+1
Elements of Stewart's adjacent brigade assigned to support Maney
15th TN, 12 models, Discipline =0
38th TN, 12 models, Discipline=0
Union OB
In my scenario the focus was on Maney's brigade which faced elements from at least two Union brigades. The OB represents elements from those two brigades.
80th IL, 18 models, Discipline =-1
105th OH, 18 models, Discipline=-1
21st WI, 18 models, Discipline =-1
123rd IL, 18 models, Discipline=0
79th PA, 18 models, Discipline =+1
1st WI, 12 models, Discipline =+1
Parson's Battery, Discipline =+1
Stone's Battery, Discipline =+1
Maney's Brigade came very close to being the instrument that nearly rolled up an entire Union Corps. At this point in the battle some Union regiments were already tired and falling back. The discipline factor above reflects those units. Some Union regiments could not move until a certain turn was reached (activated). In another case Stone's Battery would have to withdraw if certain Union regiments were routed. This was unknown to the Confederate player. The 15th and 38th TN from Stewart's Brigade must align with Maney's brigade and must attempt to pace them. In addition to that they could stray farther than 12" from the board edge on which they placed. These fog of war rules for the scenario.
 |
| I used one of my colorful Zoauve units although no Union Zouaves were present. The figures are Musket Miniatures. (painted as the 14th Brooklyn) |
 |
| This unit is a combination of Irregular and Musket Miniatures. It could not activate until turn 3. |
 |
| Airfix crews with Musket Miniatures guns. |
 |
| Each unit had a unit ID as shown here. |
 |
| This unit represented the 41st GA the only non Tennessee unit in Maney's Brigade. It was a new unit to the brigade designed to bring the brigade up to strength. Most of these figures are 20mm Irregular Miniatures |
 |
| Turner's battery the background giving cover fire to one go Maney's TN Regiments. (Musket Miniatures for the infantry) |
 |
| Turner's Battery. The crewmen are from Irregular Miniatures (20mm) and the guns are again Musket Miniatures. They made a fine line of ACW artillery. |
 |
| Turner's Battery caisson with Airfix crew. |
 |
| Bring up another gun! |
 |
| Another one of Maney's TN regiments. The figures are Musket Miniatures with an admixture of Revell poses. I like the standard with the Perryville battle honor! |
 |
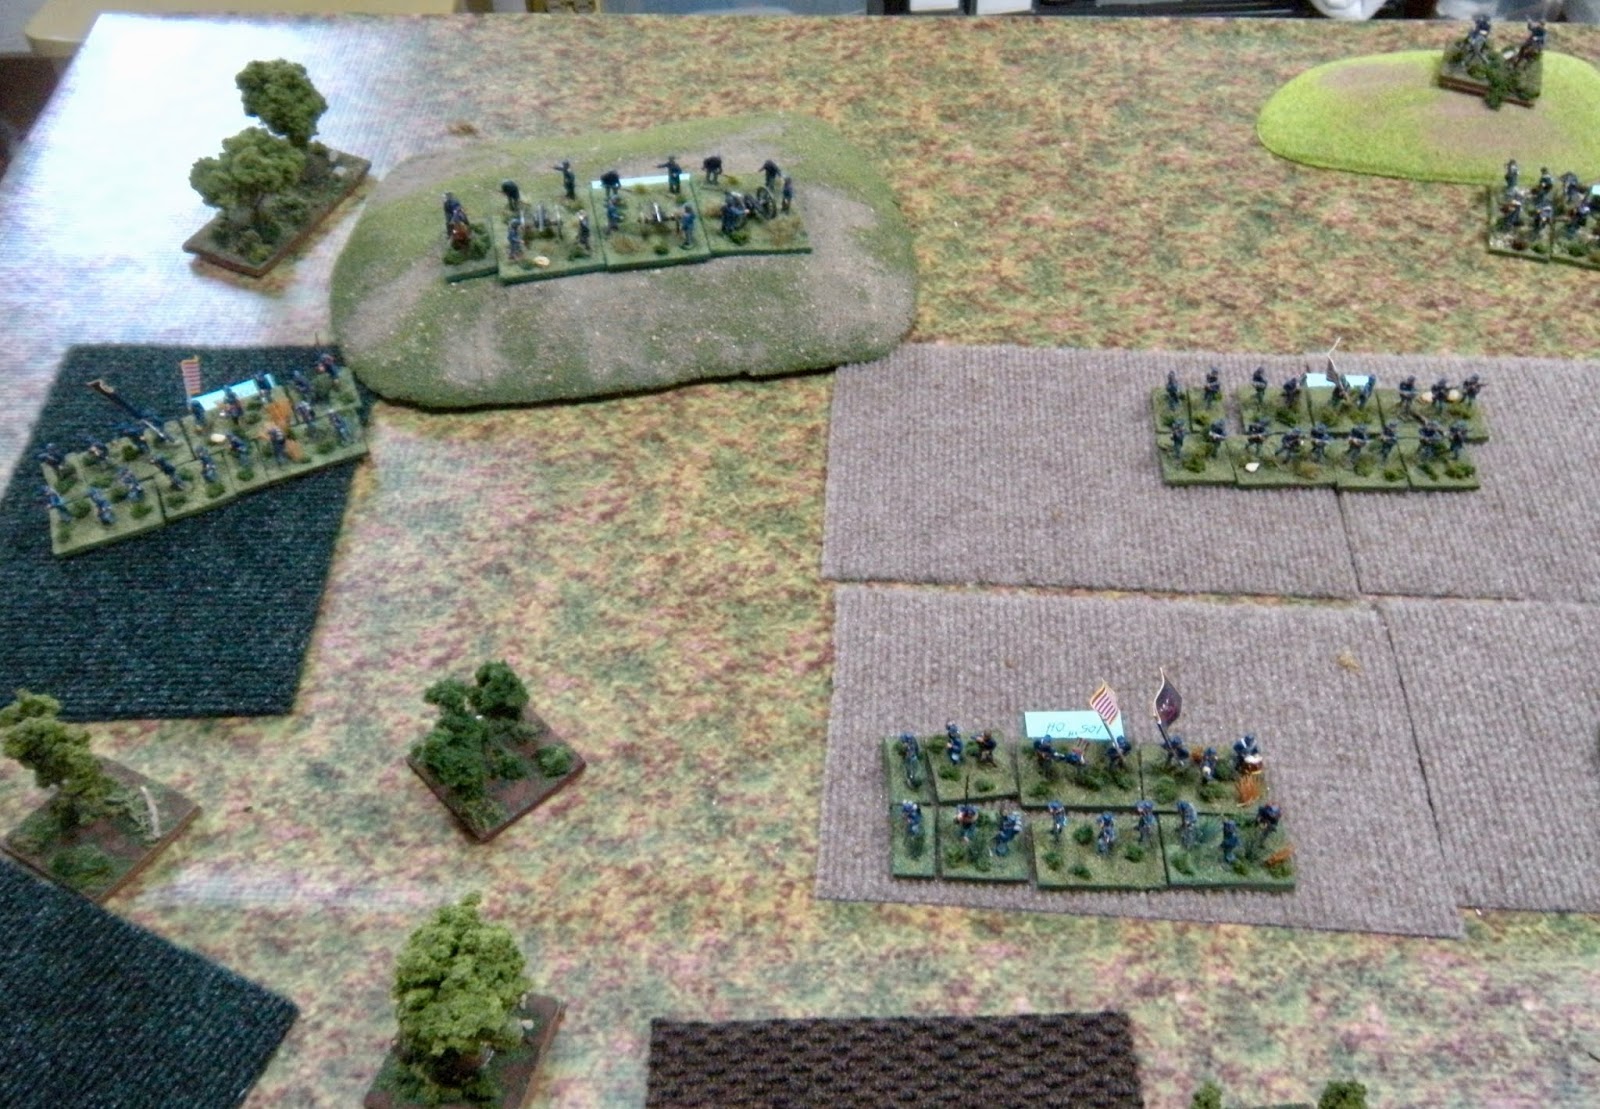
| Overview of the Union center and left flank at the start of the game. The units in the large field could not activate until turn 3. |
 |
| The Union right flank. |
 |
| The Confederate left flank and part of the center. |
 |
| The Confederate right flank. The two units on the far left of the picture are represent the units from Stewart's Brigade. |
 |
| The 1st Wisconsin. The figures are from the excellent ACW Strelets sets. |
 |
| The figures here are from the Strelets Confederates skirmishing set. Excellent figures! |
 |
| I only use two models for the one gun in the rules so this picture was taken prior to the game because I though it was cool. The crews are IMEX as are at least a couple of the guns. |
 |
| Division commander Cheatham giving Maney his orders. |
 |
| I just enjoy these two vignettes. |
 |
| Nice close up of Turner's Battery |
 |
| Rally boys, rally! The center figure is from the Strelets Union Staff set and the other two are Musket Minaitures. |
 |
| A Union regiment consisting of Musket Miniatures. They were marketed as 22mm. It was an excellent and exhaustive line. The line was sold and the new owner has put them back on the market and then took them down repeating the process at least twice for some reason. I've only found some on eBay as of late. |
 |
| Three os the TN regiments of Maney's Brigade. Excuse the South Caroline flag. The figures are classic Airfix and part of my Hampton's Legion impression. |
 |
| Most of my infantry units for Rebels and Patriots have 18 figures. It's easy enough to reduce them to 12 figures if needed. The rules are glorified skirmish rules built around "a company." The authors suggest that scale does not matter much so call your units what you will and it will not affect game play. I admit I find this a little awkward but in this case it worked very well. |
 |
| An IMEX vignette-guns to the front! |
 |
| The 1st WI would die to a man after a heroic stand. |
 |
| Another Union Infantry Regiment-mostly Musket Miniatures with a few Irregular. My interest in 20mm (1/72nd) figures dates mack to my earliest days of wargaming when all we had were Airfix figures and Roco Minitanks. |
 |
| Another pregame picture. I use the same figures for other sets of rules and a three model battery is a possibility in some sets. |
 |
| The figures are mostly Irregular but there a few Waterloo figures as well. Irregular and Waterloo figures are close to 20mm and mix well. |
 |
| The carpet squares represent farm fields. They had an affect on visibility. Having walked the actual battlefield it's hard to minimize the effect of terrain. A rifled musket might be effective out to 300-400 yards but if you can't see more than 100 yards in front of you it doesn't matter much. |
 |
| The Union position looked intimidating to the Confederate player and indeed it was since two Union batteries over looked portions of the battle field. The Confederate player did not realize that 1\2 of the Union infantry were already fragile and that if some routed at leas tone battery would limber up and move away. |
 |
| One of my two Newline 20mm CSA regiments. Excellent figures, a bit chunkier than most 20mm but look great in their own units. |
 |
| Stone's Battery awaits the Confederate advance. |
 |
| Portions of the 1st Wisconsin-my home state! |
 |
| The two units represented portions of Stewart's Brigade assigned to align with Maney. They had limited flexibility. As it turned out they both survived nicely and were critical is a very narrow Confederate victory. |
 |
| Maney's Brigade would carry the day but by a slender thread. The unit in the back is the 1st Tennessee of Company H fame. Atkins is quoted in the book. |
 |
| Almost a ground level view of the beginning go the Confederate assault. |
 |
| Here they come boys! |
 |
| The Union Regiments in the field were exhausted already and had poor discipline to start the game.The 21st Wisconsin posted in the back of the field could not even see what was going on. By the time they could move the Confederates were on top of them and they routed just as their historical counterparts did. |
 |
| The 123rd IL would virtually destroy the 41st GA with help of Parson's Battery. |
 |
| The 41st GA begins their advance. |
 |
| Historically Parson's battery performed heroically but was over run. In the game it survived. |
 |
| Across a deadly field. |
 |
| It looks bad here for the Rebs and it kind of was. However, the 1st WI is at 1\2 strength and would soon rout thus forcing the withdrawal of Stone's battery. The Union left then collapsed saving the day for the south. |
 |
| The Union right held firm but would have to withdraw best they could. |
 |
| This is a pretty good aerial shot of the initial set up. The fields were all high grass or corn and did provide cover. |
 |
| The view from the Union side. |
I was very well pleased with this game.