For of those you unfamiliar with the Command and Colors Ancients maps\scenarios here is Mr. Bisio's rendering of the map and troop types as per CCA.
 |
| More pics below |
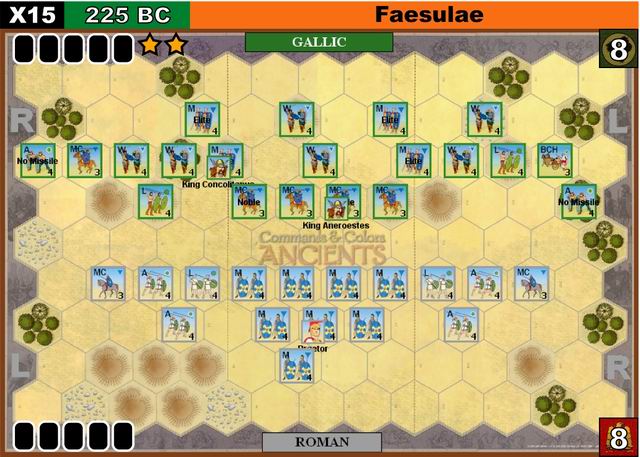
What I do is take the author's map and order of battle and convert to a DBA type board (in this case 36" by 36") and convert the CCA troop labels to DBA terms.
CCA Historical Background by Mr. Bisio:
“The Celts, then, descended on Etruria and overran the whole region, plundering the country as they chose, and as they met no opposition, they advanced on Rome itself.
When they had arrived at Clusium, a city only three days march from Rome, news reached them that the army which the Romans had posted in Etruria was coming up in their rear and was close upon them, whereupon they turned back to meet it, full of ardour to engage the enemy. At sunset the two armies were almost in contact, and they encamped for the night with only a short distance separating them. When it was dark the Celts lit their camp-fires. They left their cavalry with orders that they should wait for daybreak, and then as soon as they became visible to the enemy they were to follow the route which the infantry had already taken. In the meanwhile the Celts with drew their main body under cover of darkness towards a town named Faesulae and took up positions. Their plan was to wait for the cavalry, and at the same time disconcert any attack by the enemy by confronting them with an unforeseen situation. When the Romans sighted the cavalry at daybreak and saw them unsupported, they concluded that the Celts had fled, and so pursued the cavalry along the line of the enemy’s supposed retreat. Then, as they approached, the main body of the Celts sprang forward from their positions and charged them. A fierce battle followed, which was stubbornly contested on both sides, but in the end the courage and superior numbers of the Celts prevailed. The Romans lost 6,000 men, and the rest took to flight, most of these retreating to a hill which offered them a naturally strong position. The Celts at first tried to take the hill by assault, but were exhausted from their march of the previous night and by the suffering and hardship caused by the fighting, and so they made haste to rest and refresh themselves. But they left a detachment of cavalry to guard the hill, and determined to attack the fugitives next day unless they offered to surrender.”
Meanwhile the…consul Lucius Ameilius Paullus, who was in command of the second Roman army near the Adriatic, had been informed that the Celts had invaded Etruria…He hurried southward to help, and fortunately reached the battlefield at the critical moment..
He encamped near the enemy, and the Romans on the hill, as soon as they saw his camp-fires, understood what had happened….The commanders of the Gauls, who had also seen the camp-fires, concluded that the enemy had arrived and held a council of war. At this King Aneroestes argued that since they had by now captured so much booty…that they should not battle again and thus put all their gains to risk, but should return home in safety….The council decided in the circumstances to follow Aneroestes’ advice. They agreed on this during the night, broke camp before daybreak and marched through Etruria along the coast. Paullus then rescued the surviving remnant of the Roman army from the hill and united it with his own force. He decided that this was not the moment to risk a , pitched battle, but chose to follow the enemy’s rear and watch for a favorable place or moment to harass him, or recover some of the plunder….
(From Book II of Polybius’ Rise of the Roman Empire written in the 2nd century BC)
(Paullus, of course, shortly thereafter, with the help of his consular colleague returning from Sardinia, managed to corner this Gallic Army up the coast of Etruria at Telamon and destroy it. See the Telamon 225BC scenario, for an extensive excerpt from Polybius that covers these events)
Here is my Order of Battle
Gauls
Gaul Right Flank (8 elements, full pip die roll for movement)
1 Cv
3 Bd inc a command element
3 Wb
1 Ax
2 Ps
Gaul Center (9 elements, full pip die roll for movement)
5 Cv inc a command element (King Aneroestes)
2 Bd
2 Wb
Gaul Left Flank (5 elements, 1\2 pip die roll for movement)
3 Wb
1 Ax
2 Ps
1 HChar
Romans
Roman Right Flank (4 elements, 1\2 pip die roll for movement)
1 Cv
1 Bd
2 Ax
2 Ps
Roman Center (11 elements, full die roll pip +1 for movement)
7 Bd inc 1 command element Proconsul Aemilius Paullus
2 Sp
Roman Left Flank (3) Pip = 1\2 pip die roll
1 Cv
1 Bd
2 Ax
2 Ps
Rules and Stuff.
Anyone familiar with DBA will recognize that my lists do not correspond with DBA. For example there were 22 elements of Gauls and 17 elements of Romans in this game-almost twice as many as in a DBA basic match type game. You will also notice that Ps elements are not included in the totals above. This is because I ordinarily make Ps a sub-unit of another element. Their usefulness is reflected in that they give a +1 to both CF to the unit they are attached to.
You will also notice that the Gaul elements consist of Bd, Wb and Ax. In my view Celtic armies could easily have elements rated as all three types with the Bd's (and Cv) representing the wealthier heavily armored nobles and retainers, the Wb as the rank and file while the Ax would be the less well armed and armored.
This is the second game we've went with my list for Gauls and it's worked well both times. As my friend said, "the Celts were not wimps" and I agree.
As for the Romans I rated their Ax as superior in morale (Extraordinarii). If memory serves me I stole that from Field of Glory.
Command elements function as the elements they are classified as.
Morale???
In this game I sought to experiment with a basic morale system so that an endless series of recoils would not occur. We still use the basic rules based on the ratios and the morale only comes into play when the ratios do not apply..I got the original idea from a DBA fan site that is no longer in operation. For those of you interested in such things here it is.
Element Morale
1stRecoil 2ndRecoil 3rdRecoil
Superior NE NE Eliminate
Average NE -1 to CF Eliminate
Poor -1 to CF -2 to CF Eliminate
1. NE=no effect
2. CF-both combat factors
3. Recoils need not be consecutive.
4. Morale ratings assigned as per scenario and relative to all element types.
How the game played--the captions tell the story.
 |
| The Roman left flank. The hill was key in the historical account preventing an even larger Roman disaster. |
 |
| The Romans thought they were pursuing a Gaul rear guard of cavalry and were stacked up in the middle. Hint: Gaul Cv rated as superior area match for Roman Bd. |
 |
| The Roman right flank was a mirror of the left minus the protective hill. |
 |
| The Gaul center prior to the festivities. The Druids are doing their best to stir up the Gauls to might deeds of valor! |
 |
| The Gaul right flank. The facilitate the surprise attack I masked the Gaul flanks with terrain features. The Gauls received one free move to start and had a 50% chance of moving first in the next bound. They did! |
 |
| Nice shot of the Gaul center. The King's Cv element is backing 4 elements of Cv that would crash into the unsuspecting Roman line. The Cv is backed by a powerful group of Bd's and Wb's. The Druids have withdrawn to continue their annoying chanting. |
 |
| The Gaul left flank just before their free move over up and over the terrain. |
 |
| The Roman left. Ax supported by Ps. One element of Bd on the right. The Romans would back up the hill asap and the Gauls elected to not test them and instead concentrated on a do or die effort in the center. To win the Gauls has to destroy 8 elements, 6 of which had to be Bds or Sp without losing 10 elements of their own. |
 |
| The Gaul cavalry charge in the center. 2\3 of the Roman first line would fall victim to it! |
 |
| The Roman right stares across the filed at the cautious Gaul left. Some elements of the Roman right would factor into the eventual Roman victory. |
 |
| I just like this picture better. The Ps in front of the Ax are sub-units. They evade for free so sometimes they are on front for looks and sometimes in back. |
 |
| The Roman front line is collapsing. The Roman third line of Triarii is reinforcing the Roman second line to prevent a disaster should the Gaul Cv break through. |
 |
| The Roman left is not going anywhere and neither is the Gaul right. |
 |
| The Roman right splits to assist the Roman center. |
 |
| The Roman first line has dissolved but the second has recoiled the Gaul Cv. Whew! (One element of Gaul Cv has been eliminated in a 2-1. it's placed has been filled by the King's Cv. Although necessary it would prove fatal to the Gauls.) |
 |
| Safest place to be-Roman left and Gaul right in a staring contest. |
 |
| The Gaul King's CV and another have been eliminated in 2-1 ratios. The "Sudden Death" rule was applied. On a roll of 1-2 the Gauls would withdraw to mourn their brave king. On a roll of 3-4 they would not be affected and the other lesser king would assume command. On a roll of 5-6 they would become enraged at the loss of their king and fight with +1 for the rest of the game. The Gaul player rolled a "2" and the Gauls withdraw after giving the Romans a good scare! The small dice represent a tracking system for the recoils. |
 |
| The Roman right provided valuable assistance to the Roman center. |
One of my goals is to be able to replay the scenarios. I try to have a few variables such as a rule that provides for a level of degree as to how effective the surprise was. Dicing for the effect of the death of the Gaul king was another.
Another goal is try and have enough time to play the scenario twice and switch sides. Doing that has a number of advantages when it comes to determining how re-playable the scenario is. If you get the same old outcome every time you play it can become a bit predictable and boring. Fog of War stuff can change that as can a commander who has a different plan.
And so it was in our second game (two games in 3 hours!).
The Gauls lost in sudden death in the first game (Fog of War rule) but in the second game won by a ration of 8-1. The Roman commander attributed the loss to Fog of War (bad dicing). He has been transferred to MooseButt, Germania for the loss ;-)
Whatever the case I'm trying to do a scenario that has more to do with a simulation than a competitive match. At present I'm trying to figure out how to do Telemon and that will complete a three game series.
 |
| My Roman infantry were all from Zvezda |
 |
| Classic Airfix: A good part of the Gaul army consisted of these fine figures most painted 20 years ago or so. |


