Wednesday, November 14, 2018

I hope it's Eye Candy #1


I'm frustrated with Google+ which is going away anyway but also frustrated with Blogger. I haven't changed anything yet I cannot post my blog to Google+ in the usual way and the truth is I can't post it at all since the screen goes white and just hangs there. As a result I have to copy the address of my latest blog and then paste to my Google+ communities (which have been loads of fun).

To make matters worse all of sudden I can't respond to the kind comments people chose to leave on my blog. Hit reply and it looks like it will work but does not. As I said, I've changed nothing and not being a techie I'm finding Google+ and Blogger to be rather unfriendly. I'm seriously considering migrating to WordPress where I have two other blogs and to FB which has a number of gaming communities and a simple copy the dares and paste method to post a blog or pictures.

In the meantime I have games stacking up and reports to write and because of the Google problems have not bothered. Yet, I have some pictures to share but have forgotten much of the action attached to the pictures.

This group was taken for my DBA-BR game. It features an early Carthaginian Army versus a Syracuse type Greek Army. It was a lot of fun and the Carthaginians lost by a wide margin.

The Greeks are from my friend Mike S. As you can see they are superbly painted.


Monday, November 12, 2018

The Destruction of Pasha Hicks

Some weeks ago I posted teaser for an upcoming game. The post featured my The Men Who Would  Be Kings (TMWWBK) Egyptian Army. We use approximately a double list from the rules for our colonial games and I have a number of house rules that provide flavor.

We finally got around to doing the game after numerous cancellations. My friend Jim brought over his excellent collection of Mahdists and we were ready to go.

I was the game master as well as one of the Egyptian commanders.  My command would be all the mounted Egyptians while my friend Mike commanded the infantry and artillery. Mike and I played the part of Hicks and his staff of European officers. Mike was not all that keen on our "walk down the Nile" and I can't say I'd blame him given the numerous handicaps I had assigned to the Egyptian force. (They were not rated nearly as effective as they are in the TMWWBK lists.)

My friend Jim and my son Justin commanded the forces of the Mahdi with each of them having a Rub (pronounced Roob) each. The handicaps assigned to the Mahdists were variable leadership skills as the tactical level. (They had a number of units that turned out to be poorly led.) On a higher level the Mahdists only had two Rubs present at the start of the game while the other two had to be diced for. Since the remaining two were supposed to be deployed to the side of traveling Egyptian square the idea was to not make it too easy for all the Rubs to attack at once.

The Egyptian battle plan recognized that we had a little time so we elected to try and break through the Rub to our front before the other Rubs could effectively surround us.

In addition to having sub-standard firing factors the terrain hindered the Egyptian line of sight. Historically the Mahdists were able to get very close to the Egyptians. I reflected this advantage by making all the terrain of the type where it was difficult to sight the stealthy Mahdists.

Never-the-less, Mike and I thought we had a chance to bull our way through.

The pictures below are not in any particular order because it is hard to be a game master and take pictures and then get them in sequence with appropriate comments.


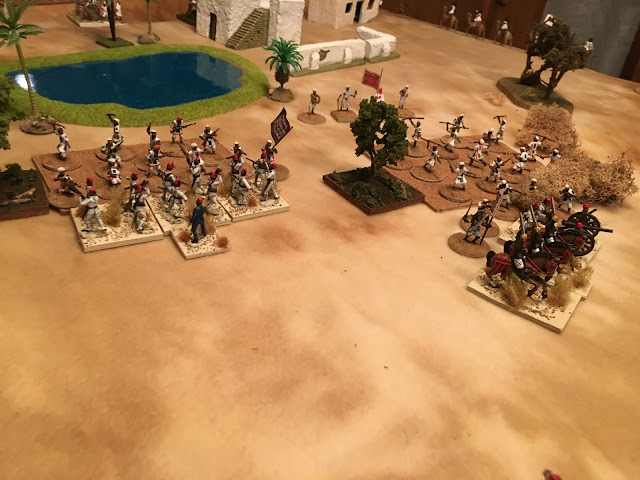
This pic gives a good view of the Egyptians trying to deploy to their front.The camel troops were supposed to outflank the Rub to their flank while the Bashi Bszouks (center of the picture) were to gain the other flank. Sadly, they failed to move in a timely manner and were destined to be destroyed by camel mounted Hadendowa. The two Krupp cannon were a mixed bag when firing. I made the rule where they had to dice to fire and half the time they failed (considered ineffective actually). When they did get to fire it was effective.

Close up of one of the flanking Rubs. Two of the three units are the nasty Beja Hadendowa.

Egyptian camelry, infantry and artillery approach the oasis held by the Black Flag Rub (pronounced Roob)

The Green Flag Roob advances!

Egyptian forces try to form a square. Pasha Hicks and his staff try to direct a defense but it does not look good.

Pinned Egyptian camelry is about to be charged by Arab camelry and die valiantly!

The empty space represents the space where Egyptian units perished.

The Blue Flag Rub comes in on the other flank. There is no way out!


The Black Flag Rub counter attacks against the rapidly crumbling Egyptian lines.

This will not go well for the fellahin!

It won't be long to complete the massacre.

Egyptian Gendarme lancers at the start of the game looking sharp but that won't save them.

Fellahin at the ready supported by the Khedive's Cuirassiers.

Tough Sudanese!

One of the Krupp breechloaders that would prove mostly ineffective.

Camel troops are usually mounted infantry in the rules.

A smoothbore artillery piece as an anchor.

Bashi Bazouks, bandits really. Probably just burned down a village.

Hicks and staff ready to die to a man and they would.

Khedive's Cuirassiers 

The Square

The Square

Nice close up of the Egyptian camel corps.


Fellahin close up

Sudanese close up

Sunday, November 4, 2018

My DBA Trebbia


Doing an ancient battle that featured an ambush is no easy task if you want the ambushed to have a fighting chance of victory.

Historically, Hannibal pulled off an ambush of a Roman army near the River Trebbia in 218 BC. The Battle of Trebia was a resounding defeat for the Romans with only 10,000 of their 40,000 men surviving to fight another day.

Hannibal managed to coax the Romans into crossing the icy Trebbia to make a frontal assault on his deployed Carthaginian army. At the same time Hannibal managed to get his brother Mago concealed behind the Roman juggernaut and attack them from the rear just at the right moment.

The Roman's fell into a carefully planned trap.

To try and reproduce the battle with my version of DBA I used the map below from Command and Colors Ancients (CCA).

I convert the board game counters into the corresponding elements in DBA and come up with an Order of Battle. I match the deployment on the elements to the map and set out victory conditions that give, in this case, the ambushed Romans a fighting chance.

The Order of Battle is given below the map I copied from the CCA website (lots of free scenarios for ancients there).

I took pictures of the game but they are not in order and since the game was a month ago I've lost the blow by blow which ended up in a Roman defeat. They did have a chance.

I will try to caption the pictures for the interested reader.


Carthaginians
2 Cv
2Lh
4 Sp
2 Ax
2 El
3 Ps

Ambush force
1 Cv
2 Wb

Romans
3 Bds
1 Sp
4 Ax
2 Wb
2 Cv
3 Ps

I tried to capture the entire battle line except for the ambush force. The Carthaginians are on the left side of the picture. The double ranked spearmen are in phalanx and represent Hannibal's Libyans. There is Iberian cavalry on the Carthaginian right and Numidian's on the left with each flank having an elephant to terrorize the Romans. The Romans are on the right of the pictures and have just crossed the river. The velites are out front challenging the Balearic slingers and other light infantry. Triarii are supporting the hastatus and princeps and Roman\Italian cavalry are on each flank.
This picture flips everything around for a better look. Roman cavalry on the left of the picture have turned to face the emerging ambush force while the Numidian's are pressing the attack from the other direction! Adjacent to the Roman cavalry is an element of friendly Gauls who are at the moment wishing they were on the other side!
View from the Carthaginian side of the field. The Carthaginian phalanx is holding back while the flanks try to close and the ambush develops. Celt cavalry and a couple Wb elements are engaging the Romans causing some elements to try and turn to meet the threat. The Triarii who were in reserve suddenly find themselves in the thick of it with the Celts from the ambush.
The Roman right is collapsing between the Numidian's and the ambush force. The small white dice represent recoils. In my DBA version elements are allowed "X" number of recoils before they are destroyed. This is determined by their morale status. The other recoil rules as per DBA 2.2 still apply and my rule simply prevents gridlock.
The Carthaginian right. The cavalry element on the flank of the elephant is Iberian and has just destroyed a Roman element
This picture gives a good idea of what the ambush force is accomplishing. Celts have pinned down the Triarii long enough as the other Celt elements help collapse the Roman right. It is hard to fight in two directions at the same time. Oh, that wily Hannibal.
Libyan and Iberian infantry close in on the Roman center. The encirclement is developing-note the Numidian cavalry coming in on the Roman flank.
The Roman left held out pretty well keeping the Carthaginians at bay but in the end it was to no avail.
Iberians, Celts, an elephant and Numidian's all victorious on the Roman right and reorganizing for the final kill.
The Roman center being picked apart from the front and flank.
The Roman left still holding out but it doesn't look good.
Even the Triarii have been flanked!
The Roman center again. It won't be long now.
Boom! The end.
The game was a great time. It won't be easy to take on Hannibal the Great. More to come in my Second Punic War series.