I resurrected an old set of ACW rules called
Rally Round the Flag. It's the set my friends and I used way back in the 1970s and 80s. Although we've tried
Black Powder we found it a little complicated in the sense we don't have that many opportunities to play the period. With that in mind I got an old copy of
Rally Round the Flag and modified a few things to bring it a bit more up to date with other systems.
The scale is Brigade\Regiment and a player can reasonably control 2-3 brigades. This is the third test game I've ran using my modifications to the original rule system.
The key modification to the IGOUGO movement system is Command Points (CP). I actually got the idea from a later edition of
Rally Round the Flag. That edition really did not have much in common with the earlier one but the command point idea was very useful.
It works by assigning "x" number of CP's to a brigade. The base number allows 1 CP per unit in the brigade. This is adjusted by a random die roll per turn and can be further modified by the division or brigade commander's rating (which can be historical if you do a little research). Points are spent by moving, maneuvering, move and firing, rallying, etc. A brigade can end up with as few as 1-2 points in a turn or as many as 7-8 for an average size brigade. The more points you have the more actions you can perform in a turn. I think it represents the fog of war in an ACW battle quite well and it requires the player to usually have to make priority decisions.
The scenario was an adaptation from the Potomac Wargamers people. It was modified a bit to fit my system. One of the strengths of getting their scenarios is the detailed Order of Battle that includes the type of musket, carbine and artillery that the soldiers actually had in a particular battle. All of their scenarios are available via the Wargames Vault.
In the Little Suger Creek scenario the Union forces are pursuing a Confederate rearguard. They finally have caught up and the Confederates have formed a line of battle. In terms of numbers it's about even but numbers do not tell the full story.
For example, the Union has a small cavalry brigade of three small regiments and gun section. All three of the cavalry units were green-a fact that would limit their effectiveness versus one average large Confederate cavalry unit and 2 large MO Confederate infantry regiments.
The Union did have artillery superiority with 5 gun sections to the Confederate 2 sections. All the guns were either 6lb smoothbores or 12lb howitzers.
The Union had four infantry regiments with two being green and two being average. Some of the regiments were of only 4-5 stands and this was because a lot of straggling had occurred in the pursuit.
The Confederates had five infantry regiments with one being crack and the the rest average. Morale in RRTF is critical and the key category of morale the Confederate infantry clearly had the advantage.
When it came to small arms the Union had two regiments of smoothbore muskets and the Confederate's had four. The Union therefore a slight advantage with two rifled musket units to the Confederate's one.
When I assessed the game and victory conditions I though the Union had a sight advantage given how many gun sections they had.
Note in the pictures below that the terrain is being worked on. The Geo-Hex hills are 40 years old and need to be spray painted. We need better roads so that we don't have to camouflage them with large clumps of lichen! The other thing that needs to be worked on are some of the stands. I need to rebase some for my RRTF system.
My son and I played out the scenario last week. He played the Union and me the Confederates. I'll try to give an account of the action with the pictures.
 |
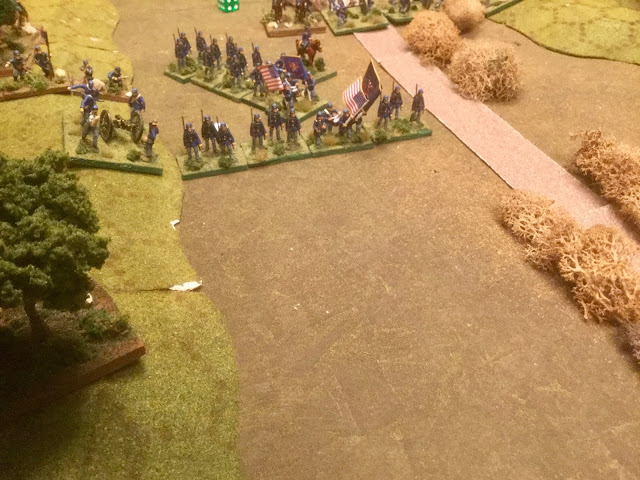
| The Confederate brigade on the right consists of two Arkansas regiments and a crack Louisiana infantry regiment. On the left is a mixed Missouri brigade of of cavalry, 2 infantry and two gun sections.The Missouri brigade's General Little was above average. |
 |
| Good picture of the initial positions of the MO Brigade. |
 |
| The Union right flank to start. They are Indiana and Ohio troops. Most are green. |
 |
| Union left flank. The Union player centered 4 of the 5 gun sections and yes it was intimidating. |
 |
| The MO brigade attacked through the light cover on the ridge. The Confederate player thought it was his best chance to avoid the heavy concentration of Union guns. As it turned out the MO brigade rolled and got a impetus charge move and thus made it much easier to get some momentum with the whole brigade. |
 |
| Confederate right flank. The CSA dice throwing on this flank was terrible and only the LA regiment contributed anything to the fight. It's the one with the SC flag. As it was the unit took a lot of casualties from the Union artillery but held it's ground throughout. |
 |
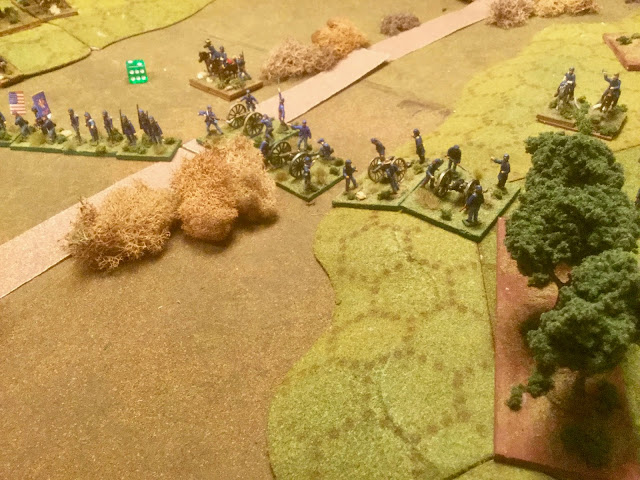
| Good picture of the Union "grand battery" and the two good sized Union infantry units moving up. The blue die tells us how to modify the point system for the turn. The Union player had a hard time on this flank despite having a good commander. It was interesting because both flanks that faced each other could not do very much in a turn. My son remarked the brigade commanders must have been drunk throughout-a good possibility in the ACW! |
 |
| The Union cavalry dismounted. The brigade commander is central to his three small units. Again, the die tells us how to modify how many points the brigade can spend this turn. |
 |
| The Confederate cavalry along with the rest od the MO Brigade went impetuous. In one sense I didn't mind but I did want to dismount my cavalry. They would have none of it and launched a saber charge instead! |
 |
| The Union player admitted making a mistake by leading with his small green Ohio unit that was armed with smoothbores. |
 |
| This large average Missouri regiment would melee the small green Ohio unit an eventually destroy it. |
 |
| It's hard to win a melee when you are out numbered 2-1 and have a morale disadvantage to start with. |
 |
| The CSA cavalry would succeed in taking out one unit of dismounted Union troopers but would be destroyed itself by near by Union units. The CSA cavalry is from rare set called Gulliver. The company made one set of figures and disappeared. |
 |
| The lichen was just for looks. Four gun sections lined up dampened CSA enthusiasm on the CSA right. |
 |
| A small Arkansas unit. The figures are from a board game. I thought they made a good early war CSA unit of perhaps a militia unit. |
 |
| The MO Brigade would win the day for the CSA. The units have been painted with historical brigades in mind and then real names are adapted for the scenario-hence the SC flag with MO Confederates for this game. |
 |
| The Union infantry on the CSA right finally moved up to the ridge edge and helped pummel the crack LA regiment. It was too little too late however. Most of the infantry figures on both sides were Italeri, |


No comments:
Post a Comment